


Without light, we can’t see anything at all, so it’s no surprise that light is the most fundamental and important element of your food photo. If everything else in your setup stays the same, but the light changes, you’re going to get a completely different photo – and depending on what those changes are (and how in control of them you feel), that could be a good thing or a bad thing.
This post is not sponsored, but does contain affiliate links which means if you click a link and make a purchase we may make a commission. This does not affect the price you pay or our decision to recommend the product!
When I started out in food photography, I worked on nailing using natural light in my food shoots. I played around a bit with using artificial light, but I just couldn’t get the look that I wanted, and I found that I was disappointed with the results. I couldn’t see what advantage artificial light had over the natural light I was used to working with.
How wrong I was!
I realised that I hadn’t understood the fundamental science behind using light in photography, and it was starting to hold me back in my food shoots. Yet when I learned those fundamentals, I realised how simple it was, and how artificial light could help me step up my food photography game.
This two part series is going to show you how you can bring consistency and creative control to your food shoots by using artificial light. I’ll be helping you get over your fear of artificial light, so that you can start bossing your lighting setup!
Lights Featured in this video
UK/Europe version – Pixapro LED200D mkiii
US Version – Godox SL200
If you don’t know where to start with what gear to choose for artificial light, we’ve created a free guide for you to get started. Download it below!
Natural Light vs Artificial Light
There’s a big myth in food photography that natural light always trumps artificial light. I get it, natural light can be BEAUTIFUL. Gorgeous even lighting, soft shadows, and natural colour temperatures… when you really understand how to work with the light you have, the results are stunning.
The key point here is “when you understand how to work with the light you have”.
Understanding how to work with light is one thing… and the light you have is another.
The trouble with using natural light? The light can be very changeable. Within one shoot, the sun can move, the clouds can move and even the colour temperature of the light can change, meaning that your perfectly set custom white balance needs to be adjusted between shots.
All of these things can make your shoot trickier, add to your editing time and make your job harder than it needs to be.
And then there’s the reality of winter in many parts of the world. Where I am, My natural light is only “good” til around 3pm during the winter months, and I can’t afford to just cut my workday short because the sun set. Knowing how to use artificial light well is an essential part of my business plan, and it should be part of yours too.
I’m quite aware that right now, I sound like the opposite of a natural light advocate. Don’t get me wrong, I LOVE natural light. When I said that I worked on nailing using natural light in food photography first, I did that for TWO YEARS! And it’s only recently that I’ve started using artificial light on my shoots, and I still LOVE using natural light. Having the skills and flexibility to know how to use both WELL is what will allow you to grow in your food photography career.
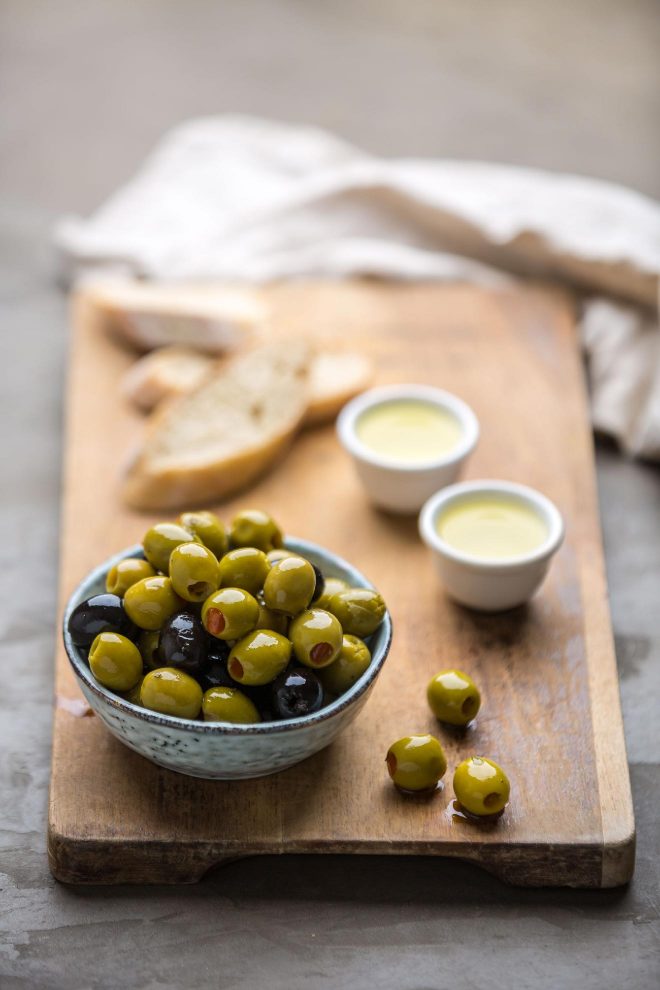
What I want to show you today, is how you can achieve those oh-so-desirable natural light results, with artificial light. It’s totally possible!
Using artificial light is something I feel a lot of food bloggers and photographers shy away from. It can be technical and overwhelming to know how to recreate that natural light look, and the process of getting there can be time-consuming and frustrating if you’re used to a comfortable natural light setup.
Confused about where to start with artificial light? We’ve created a free continuous light kit to help you choose the best gear for you. Grab it below!
So even though right now you might have a perfectly good window over there, with light pouring in ready to go, those disadvantages of using natural light are still real.
The thing I love most about artificial light is that it’s just more consistent than natural light, which in turn allows you to shoot with the same settings for your whole shoot, producing consistent results, cutting down editing time.
Related: My 3 Favourite Lightroom Tips for Food Photographers
Because your light source is consistent with artificial light, the colour temperature of the light won’t change like natural light can, so you can “set and forget” your white balance for the whole shoot, adding to the consistency. Your exposure will be less variable too, because the intensity of the light source will be exactly the same.
You also have more control over the light. You can’t control the sun and the clouds, so if you’ve got a specific look in your mind you want to create, it just might not be possible with the natural light you have available. With artificial light, you can be more creative, so as you start to develop your style and challenge yourself creatively, artificial light will help you push more boundaries and grow more as a photographer.
Now that we’ve covered why using artificial light can make your work on food photography shoots easier, and how it can boost your creative control, let’s talk about exactly what you’ll need in your lighting setup to recreate that natural light look.
Recreating the natural light look using artificial light
The Light
The first step for your artificial lighting setup is choosing the light itself. You have three main options when it comes to lights; speed lights/flash guns, studio strobes and continuous lights.
Speed Light/Flash Gun: these are portable flashes (also known as “off camera flash”) that can be fired on the hot shoe of the camera (the little slot on the top), or fired wirelessly via remotes on a cold shoe. The advantages of these is that they are very light and easy to transport, they are relatively easy to set up and you can easily move them around.
I currently shoot with 2, PIKA200 TTL strobes
There is definitely more of a learning curve with flash, than continuous light, but creatively you have far more options.
Studio Strobes: Studio strobes work in a very similar way to speed lights, but are often powered from the mains (rather than a battery), or a very large battery. The advantage of strobes are their high recycle times, meaning you can shoot very quickly without waiting for the flash to catch up.
Continuous lights: Just like it says on the tin, continuous lights are lights that are continuously on. So rather than getting a burst of light when you fire the flash, you can see how your light is behaving in real time, and make adjustments more easily. Continuous lights are a bit heftier and less portable than flash guns and strobes, but in food photography I rarely find myself needing to move the light once it’s set up, so it’s not a big deal for me.
With continuous lights, what you see is what you get, and I love that.
If you want to get started with continuous artificial light in your food photography, grab your free gear list we put together for you
The light I use (featured in the video above) is the Pixapro LED 200D mkIII, and if you’re in the US, the equivalent is the Godox SL-200. There are a number of reasons why I love this light. The first is its amazing CRI rating (how close in colour the light is to daylight), which means my white balance is near perfect straight off the bat, and I only need to make some minor tweaks when I set a custom white balance.
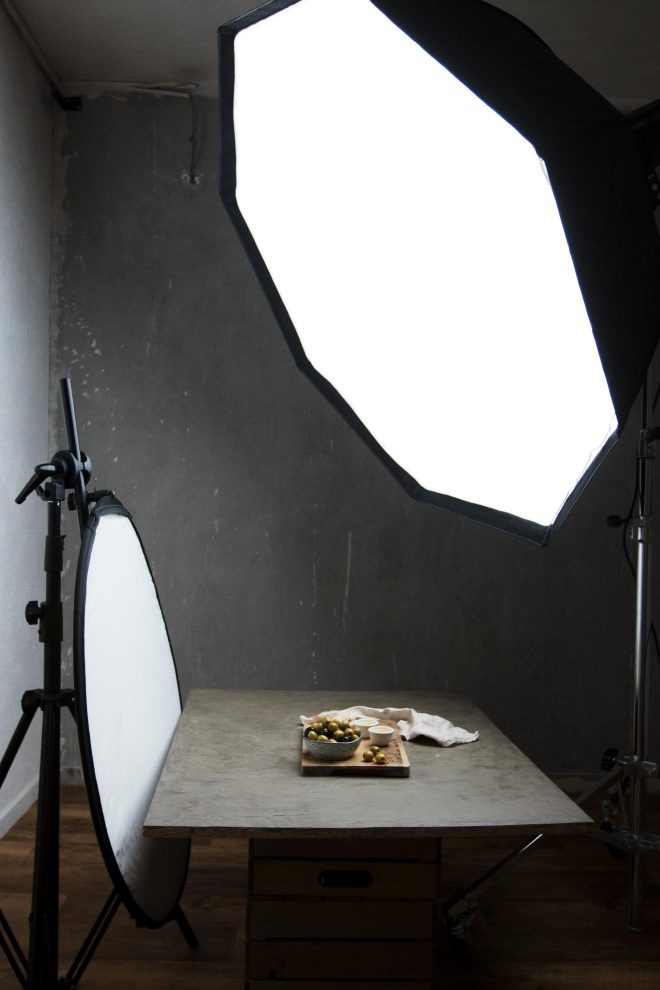
The Modifier
Arguably, the modifier is more important than the particular type of light you use, because it’s the modifier that dictates HOW the light behaves, and will really help you to recreate that natural light look.
The modifier helps you to control the size of the light source, and therefore how “soft” the light is. In short, the bigger the light source, the softer the light will be, and generally in food photography, softer light produces better results than hard light.
But what exactly is “hard” and “soft” light?
Hard light essentially means you have very strong, sharply defined shadows and contrast. The opposite of this is soft light, when your shadows don’t have a hard edge, and blend more gradually from the dark to the light areas.
When you have a light source, like a flash gun, the beam of light that comes directly from the bulb, is very small, concentrated and directional, so it produces very hard light, creating very defined shadows and contrast. But when you place the same light source behind a modifier, you have the same amount of light spread out over a larger surface area, creating a much softer light, which is better to work with in food photography.
Bear in mind that the distance from the light source to the subject will also affect the softness of the light. The size of the light source is relative to the distance it is from the subject, so even a massive soft box will create a hard light look if it’s too far away from the subject.
This is why the sun produces hard light when it’s not diffused by clouds. Even though the sun is MAhoosive, relative to the earth… it’s super far away, so it actually becomes a tiny (albeit very bright) light source. When it’s cloudy, the clouds act like a massive soft box, and you get that gorgeous, natural diffused light. That’s what we are trying to recreate with our own artificial light and modifier.
There may be artistic opportunities where hard light is exactly what you’re going for, but 95% of the time, soft diffused light is what you want.
The soft box I use is a PixaPro 120cm octagonal soft box with double diffusion. The size of this soft box allows me to use the light as if I was shooting right next to a massive window, flooding with natural light.
The advantage of using a soft box of this size, as opposed to small table top lights, is that the light source is big enough for me to shoot big, full table top shots with just one light. It keeps my setup simple, yet effective.
Another feature of this soft box that I love is the option to double diffuse the light. When you single diffuse the light source in a soft box, the light may not be completely even. The middle of the panel can be brighter than the edges, which means it’s not utilizing the complete size of the soft box for the softest light possible. The double diffusion allows you to even that out, and so while the light intensity will reduce very slightly, you will get more even lighting, allowing your scene to have even, soft shadows.
The Reflector
The last piece of equipment I use in my artificial light setup for a natural light look, is a 5 way reflector (UK) / 5 way reflector (US). A reflector is effectively a large opaque panel, usually in white, silver or gold, that bounces some of the light back onto your scene from a different direction to your light source, and it helps to soften the shadows slightly. Because I’m trying to recreate natural light, having a reflector available to brighten things up a bit can help me with brighter looks.
On the other side of the spectrum, if I want deeper, darker shadows, you can either not use a reflector at all, or use a black fill card to help absorb some of the light to accentuate the shadows further.
In part two, I’ll be showing you the exact lighting set up I used to take this photo:
So now that we’ve covered the basics of how to recreate a natural light look in your food photography with an artificial lighting setup, we’re going to go deeper into the technical side of HOW to set up your scene, what angles and directions you can use, and how to create different lighting looks in your food photography. Stay tuned for part two!
And don’t forget to grab your free continuous light gear list, to help you choose the right equipment for your food photography!
Your Turn
Do you use artificial light in your food photography? What’s the one thing you struggle most with when trying to recreate natural light?
This post is not sponsored. Pixapro kindly sent me the light and softbox free of charge. All opinions are my own and I truly believe in this equipment and use it myself in nearly all my food shoots!
Thank you for all the tips and information!
Great information, and very helpful!
Hi,
I have did some food photography with Godox ad300pro and a TT685 Speedlight as a fill light.
I was impressed how you did yours with continuous LED light, i start to think if can i use my Nanlite FS150 to my new project.
Which one you prefer in your food photo set up?
Continuous LED light, or Strobe?
Thank you
One of my best articles and video. You have no idea how this has help me. I keep coming back. Just thought I should let you know already 🙂
Very useful information. Congratulations!
Thanks Mihai!
[…] you do not have access to natural light, do not worry. The Food Photography Academy has a great two-part blog series on recreating natural light. It is definitely worth the […]
[…] you do not have access to natural light, do not worry. The Food Photography Academy has a great two-part blog series on recreating natural light. It is definitely worth the […]
Another great vid.
This was really helpful. Thanks for this tips!
Oi Lauren. Aqui é do Brasil. Muito bacana seu site e seus textos. obrigado pela generosidade.