


“Your best camera is the one you have with you”
Raise your hand if you’ve ever heard that one before… but here’s the thing, with the quality of cameras inside smartphones these days, the best camera you have might actually be the one you have on you!

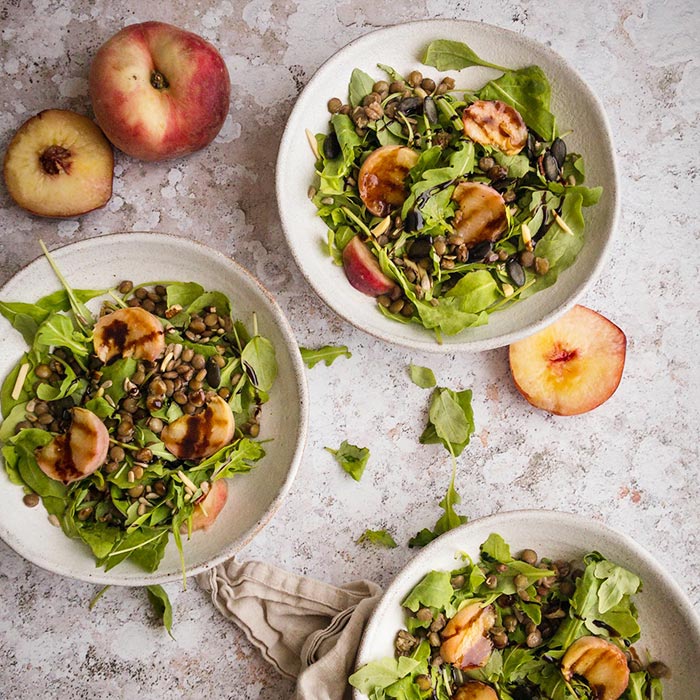
In today’s post and video, we’re diving into the world of smartphone food photography. We’re going to look at what’s actually inside your phone, the kind of photos that work (+ the ones that don’t) and take a look at the best apps for shooting and editing your food photos!
Let’s jump in…
What kind of camera is inside your smartphone?
We’re going to be focussing on iPhone’s in this post, partly because that’s what I have, but also because it’s the most commonly used smartphone. I have an iPhone 7, but I’ll also list out the differences in the iPhone 8 and iPhone X.
iPhone 7/8
Camera: 12-megapixel camera
Lens: 28mm focal length
Aperture: Fixed aperture of f/1.8
Digital zoom up to 5x
iPhone 7S
Camera: 12-megapixel camera
Lenses: 28mm fixed ƒ/1.8 aperture, 56mm: ƒ/2.8 aperture
Optical zoom; digital zoom up to 10x
Portrait mode
iPhone 8 Plus
Camera: 12-megapixel camera
Lenses: 28mm fixed ƒ/1.8 aperture, 56mm: ƒ/2.8 aperture
Optical zoom; digital zoom up to 10x
Portrait mode
Portrait lighting (beta)
iPhoneX
12MP wide-angle and telephoto cameras
Wide-angle: ƒ/1.8 aperture
Telephoto: ƒ/2.4 aperture
Optical zoom; digital zoom up to 10x
Portrait mode
Portrait Lighting (beta)
Which camera angles are best when shooting on a smartphone?
As I’m working with an iPhone 7, this means I’ve got a 28mm focal length which is pretty wide angle. It’s a wider focal length than any of the lenses I have for my full frame mirrorless.
Wide angle lenses typically work better for top down 90° angle shots (also called “flat lays”). This is because they are ideas for capturing a wide field of view. When you try and use a lens as wide as 28mm for a head on shot, you can end up with a bit of a weird fish-bowl effect, so I don’t recommend trying to take head on shots with your phone.
Related: Which lenses are best for food photography?
Zooming
The iPhone 7 and 8 have just one 28mm lens inside, whereas the iphone 7S, 8S and X have an additional 56mm lens, allowing for some optical zoom.. When you use zoom on an iPhone 7 or 8, all you are getting is digital zoom, which is an artificial type of zooming.
Optical zoom
An optical zoom is created by increasing the focal length, just like a zoom lens. The zoomed images then have the same quality as the un-zoomed images.
Digital zoom
Digital zoom is simply in-camera image processing. The camera is simply looking at the centre portion of your image and blowing it up to create a zoomed effect. As a result the pixels are also blown up to a larger size meaning you get a lower resolution image.
Using the right Light Source
When shooting food photography on your smartphone, making sure you have a good, bright light source is key. This can be artificial or natural light, the most important thing is that it’s bright enough!
When you’re working with a smartphone, you don’t have the same control over things like shutter speed and aperture that you do in a DSLR or mirrorless camera, so to avoid grainy photos with high ISO’s, make sure your light is sufficient.
If you’re working with a harsh, direct sunlight light source, a diffuser is a really handy piece of kit to have, this is going to help you keep that soft light look while shooting in the brightest conditions you have.
The best App for Smartphone Food Photography Shooting
While your iPhone has a native camera app, it’s quite limited in its functionality. Instead I like to use the Lightroom CC for mobile app for shooting and editing my smartphone food photography. It’s a completely free app (there are features you can pay for, but we’re only going to cover what’s available in the free version),
First, make sure you have the app set to “professional”. This is going to allow you to take a semi “manual mode” approach on your smartphone. Of course this isn’t quite as robust as an actual DSLR/mirrorless camera, but it’s nice to have a bit of extra control.
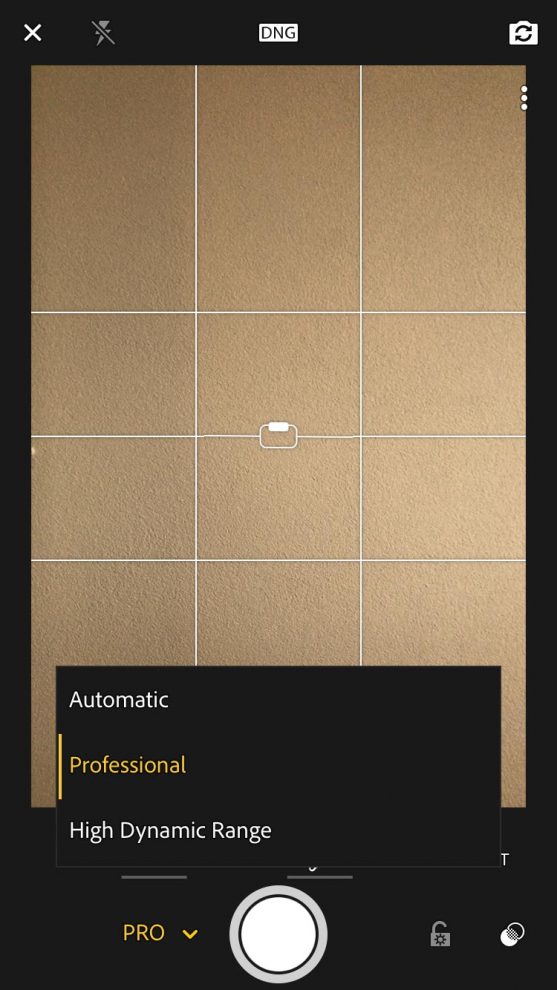
Now, let’s take a quick tour around the shooting features (you can watch a full demonstration in the video above!)
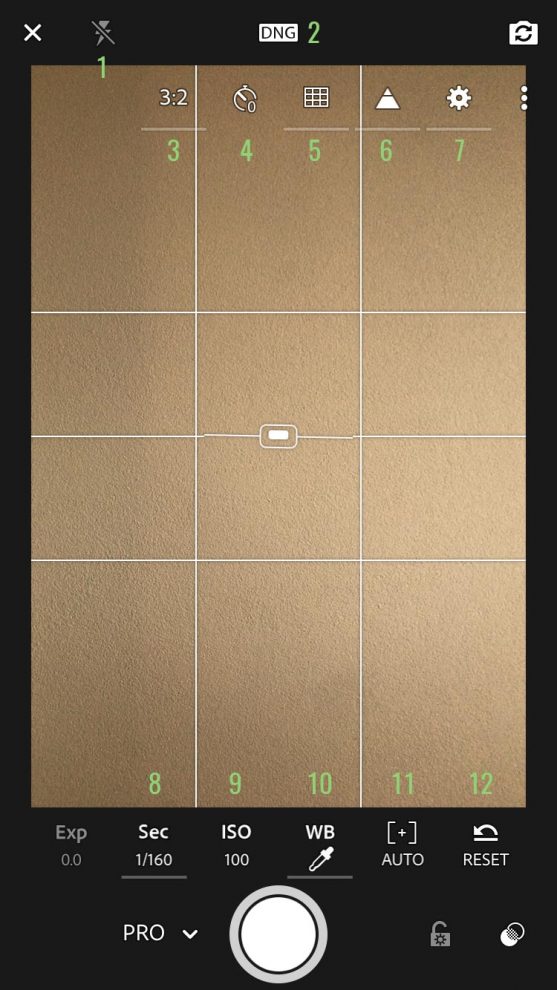
1. Flash Setting
Here you have the option to customise whether your flash is on, off or auto. Always turn it off. Just like in food photography with any other camera, on camera flash is a no no.
2. File Format
This is your phone’s equivalent or RAW or JPEG. DNG is Adobe’s RAW format, so select this for higher quality files.
Related: Why you need to be shooting in raw for food photography
3. Aspect Ratio
This allows you to choose the aspect ratio you shoot in. The options are 3:2, 16:9, 4:3 and 1:1.
4. Self Timer
If you want to step into your shot then the self timer could be a useful tool! It gives you the option to have a delay of 2, 5 or 10 seconds from the time you press the shutter until your iPhone takes the photo. You would need to have some kind of tripod for your phone to sit on for this to be effective.
5. Grid overlay and spirit level
This is a super handy feature which allows you to overlay compositional grids on your photo to aid with the composition of your photo. You can overlay a rule of thirds, golden ratio and 2×2 grid. The spirit level tells you when your phone is completely straight (this is one of my favourite features!)
6. Highlight Clipping
This tool allows you to see blown out highlights. It will add a black and white striped effect to blows out areas of your photo, making it easier for you to adjust your settings to see when you have a perfect exposure.
7. Other settings
A few basic things like how bright you want your screen.
The next settings are all focussed around manual mode. If you’re not familiar with manual mode, then make sure you hop into my free 5 day e-course “Manual Mode Essentials” to get up to speed!

Free E-Course
Learn Manual Mode in 5 days flat!
Learn Manual Mode in 5 days flat!
8. Shutter Speed
This allows you to control how fast, or slow you want your “shutter speed” to be. A slower shutter speed will let in more light, resulting in a brighter image, and a faster shutter speed will let in less light.
9. ISO
The ISO controls your camera’s sensitivity to light. A higher ISO produces a brighter image but more visible grain in your photo. I recommend keeping your ISO at 100 or 200. If you’re working with a bright enough light source this should be more than sufficient.
10. White Balance
This allows you to choose a preset white balance setting such as cloudy, daylight, tungsten etc. You can also set a custom white balance using a white balance card or a sheet of white paper.
11. Focus
This slider allows you to control how much of your photo is in focus. It works in a similar way to “focus peaking”, which is a super handy setting on some DSLRs. It will place a green cast over the in focus areas of your photo so you can make sure it’s fixed on your subject.
12. The reset button
Sometimes we start out with the best of intentions, but the settings just aren’t working and the best thing we can do is start again. This button will set everything back to zero, giving you a clean slate to retry.
Once you’ve spent some time playing around with your settings, take your photos!
Editing your smartphone food photography
With the amount of app options out there, editing your food photography from your smartphone couldn’t be easier! My favourite app for editing is the Lightroom CC for mobile App. It offers nearly all the same features as the desktop version, allowing you to really get into the details of your edit.
You can watch me edit my photo from beginning to end in the video above, as well as giving you a tour of all the editing features!
One of my favourite features is the selective editing tools. These allow you to use the brush, the radiant filter and the graduated filter, to mask of part of your image and apply edits to that part only. I use these features all the time when editing on my mac, but I find them particularly useful for smartphone photography.
The reality of shooting with your phone is that you don’t have as much control as you do with a DSLR or mirrorless camera, so being able to target areas of your photo that maybe didn’t come out as bright as you wanted, or lack a bit of contrast is easily fixed.
Then, when you want to export your photo, you can choose the size and quality to fit what you need! I normally go with the highest quality for sharing on Instagram!
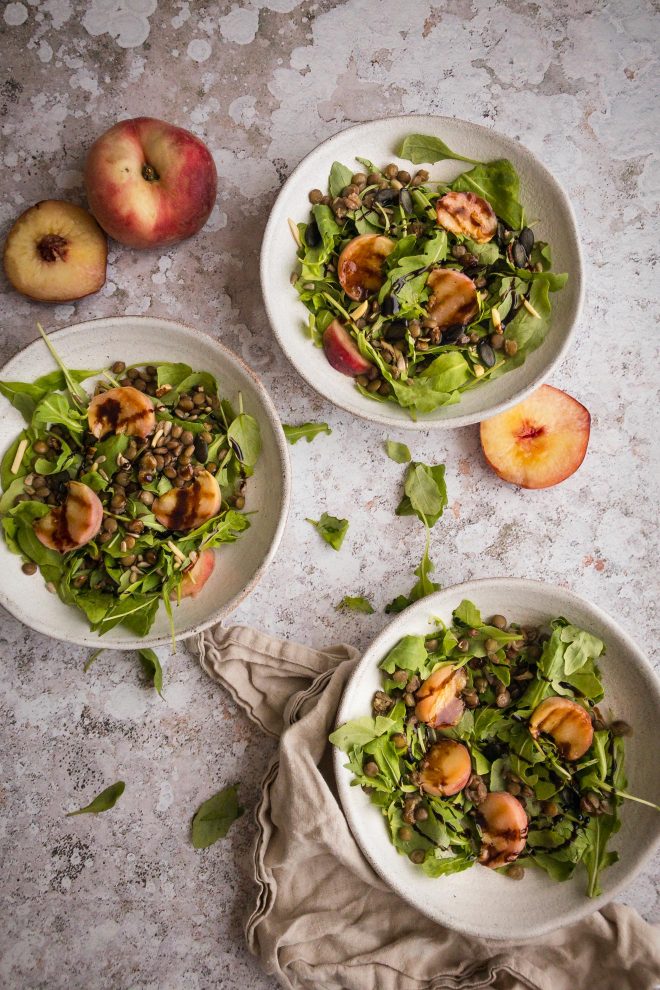
Here’s the final image:
Other apps for editing smartphone food photography
A Color Story (by A Beautiful Mess) – This is a free app (with extra paid preset packs), that offers tons of fun filters and overlays. They also sell several preset packs for desktop, so if you prefer to edit that way check them out!
VSCO – VSCO also offers presets for desktop as well as in their mobile app.
Snapseed – Snapseed has a great range of editing tools including selective editing and a healing tool.
Afterlight 2 – As well as the basic adjustment tools, Afterlight 2 includes many more features than the original Afterlight app. It allows you to edit the curves and selective colour, making it easy for you to change the mood and feel of your photos.
Join my FREE 5 day manual mode bootcamp “Manual Mode Essentials” and start taking control of your camera in just 5 days!
Free E-Course
Learn Manual Mode in 5 days flat!
Learn Manual Mode in 5 days flat!
Summary
Smartphones have come a long way over the years, and we’re pretty much all carrying round a pretty high spec camera in our pocket. Knowing how to use it to get the best possible images is key.
Understand what you’re working with. iPhone’s have pretty wide angle lenses (28mm and an additional 56mm on some models), so take photos that work with these kinds of focal lengths.
Use a good light source. You can’t control your smartphone camera in the same way as you can a DSLR or mirrorless camera, so making sure that you’re working with a good light source is really important. This can be natural or artificial, just make sure it’s bright enough to avoid any nasty ISO grain!
Shoot in the Lightroom CC for mobile app! This gives you a lot more features and options to play with when shooting.
Have fun with the editing! My editing app of choice for my smartphone food photography is Lightroom CC for mobile, but I’ve listed a few more options you can try too!
Do you often use your smartphone for shooting food pics? If so, share your Instagram snaps in the comments!
Great job! Awesome options!
Thank you.
Congrats!!
This site is amazing! Can’t believe I’ve only just found it!
I’m interested in food photography. I really have found this very useful ,learnt a worthy information. Thank you . I’ll keep following your posts .
You’re welcome! Thanks for the comment!
How did you video your actual phone as you were shooting and editing? It’s neat how the phone appeared to the side of you while you were shooting, and also to see how you edited.
Hi Lauren,
Where do you get your backdrops/
Bench tops for photo shoots?
Hi Laura! I get nearly all my backdrops from Capture by Lucy – they are incredible vinyl surfaces, I actually have a post and video about it on the blog 🙂