


In the previous post in this series I looked at the different lighting equipment and accessories you might want to consider purchasing for your home food photography studio. In this, the final installment, I cover all the non-photographic equipment that nonetheless forms an essential part of any serious food photography studio.
So you’ve cleared a corner of your home to shoot in, purchased your dream camera, and setup the lights. All you need now is the hero dish and you’re ready to go, right?
Well, not quite. First, you need an interesting backdrop. For this you’ll need an interesting background. Not only that, but in order to liven things up and help create a visual narrative, you’ll likely want to have a good selection of props on hand too.
But where are you going to find all this stuff? And how to keep it organised once you do?
Fear not, in this, the fourth and final post in the studio series, I’ll be considering everything from sourcing backdrops and props to suggesting storage solutions and other tips to make your home studio both practical and fun to work in.
Backgrounds and Surfaces
While the food itself should always be the star of the show, the background you choose to shoot it on will make an enormous difference to the final result. In fact, a quick change of backdrop can transport your hero from a rustic Normande farmhouse to a Mexican beachside grill in seconds. Clearly then, a good selection of backdrops will form the core of any professional food photographer’s studio.
Although finding interesting and original backdrops can sometimes be a bit of a challenge, this is one of the more fun and creative parts of putting together a food photography studio. In fact even though I’ve acquired quite a collection of backdrops over the years, whenever I’m out and about I still keep my eyes peeled for new surfaces, as sometimes an inspiring new backdrop can be all it takes to spark a fresh idea for a shoot.
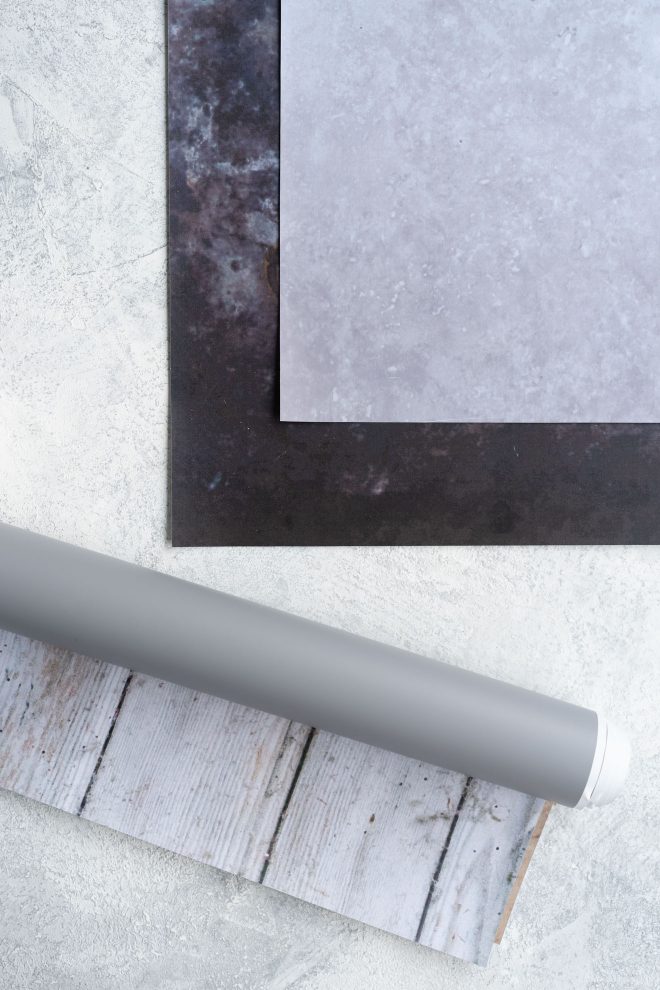
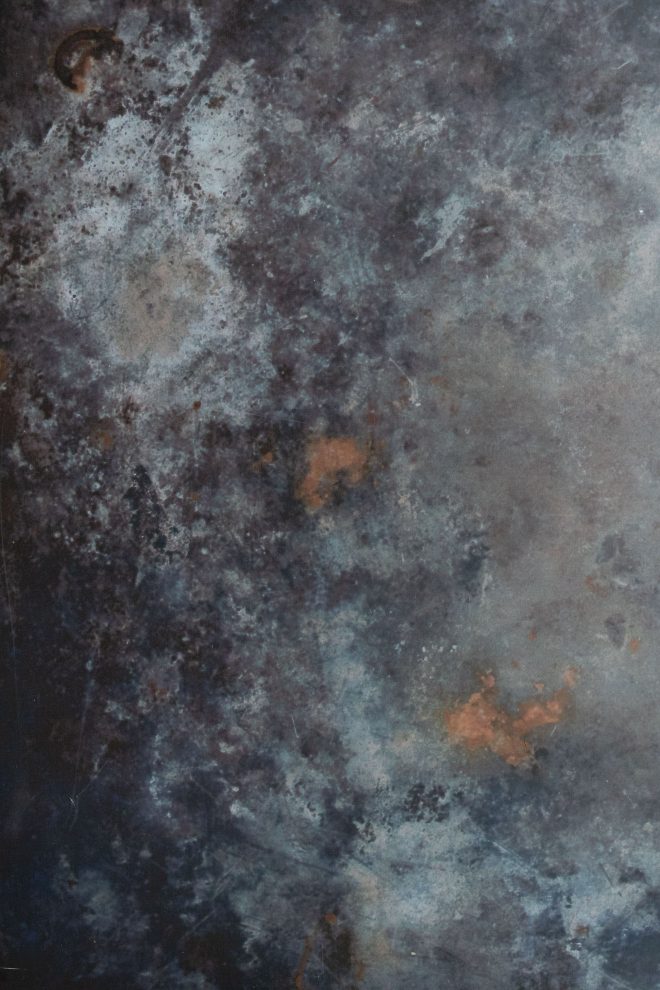
At the beginning, though, you’ll likely want to source a set of standard backdrops that you can use again and again. These might range from simple vinyl backdrops to ceramic tiles; marble and granite slabs; pieces of slate or other stone; plexiglas for slick and luxurious reflections; rustic pieces of wood; old chopping boards; even a rusty sheet of metal.
That’s all very well, but where can you find such surfaces? Again you’ll probably need to get a little creative here: interesting backgrounds can potentially be found anywhere from hardware stores and stationers to flea markets, scrap merchants, and architectural salvage yards.
Alternatively, there are a few companies producing ready-made vinyl backgrounds that mimic the look of some of the more rustic surfaces I’ve just mentioned above. I personally use a few vinyl backdrops from Capture by Lucy, which were created specifically with food photography in mind.
For more ideas on the topic of shooting surfaces, be sure to check out my guide to sourcing cheap food photography backgrounds.
Having put together a nice collection of backdrops, there still remains the question of what to put these on when shooting. If you’ve got a desk or table in your studio space already, and there’s no room for any more furniture, then this will likely do fine.
However, it can sometimes make life easier to have something lower to shoot on (no need to stand on a chair in order to look into the camera’s viewfinder), so something the height of a coffee table might work better. Some photographers even shoot with the dish placed directly on the floor.
With that said, if space is really limited, you may prefer to have an option that you can clear away easily once the shoot is over. Here there a couple of possible solutions.
Firstly, a simple piece of board and a pair of trestle legs (such as those available from Ikea or a hardware store) can be folded away and stored elsewhere when not in use. Alternatively you might want to consider using something like a kitchen cart; which is effectively a kitchen island on wheels.
These come in all different styles, colors, and sizes, so it’s easy enough to find one that will suit both your style of working and the dimensions of your studio space.
The real advantage here is for photographers working with natural light who might find that they need to follow the light around the house as it moves over the course of the day: just roll the cart over to whichever window offers the best lighting, and continue shooting – without the need to tear everything down and setup again.
If you do go this route, I recommend a cart with cabinets underneath where you can store all your gear and props for easy access.
Food Styling Props
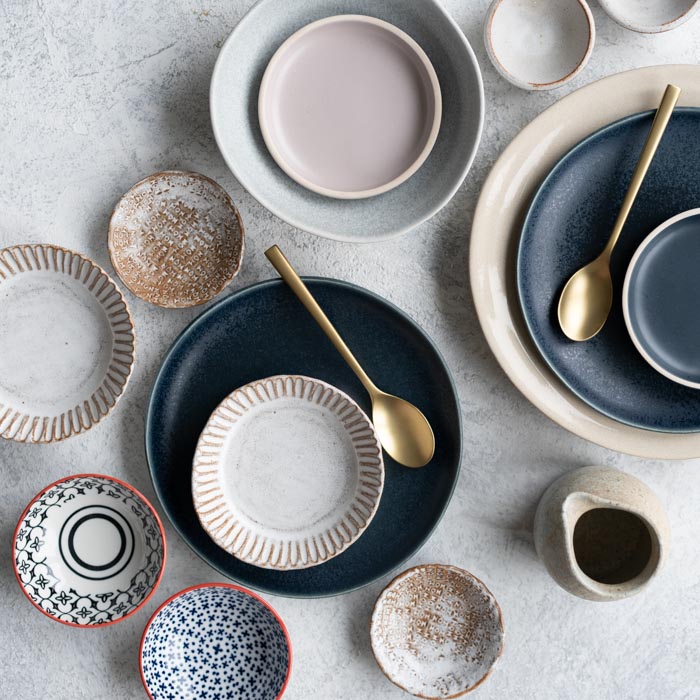
A well-equipped food photography studio will also offer plenty of props to choose from. These might include beat up old baking trays, weathered chopping boards, vintage glassware, rustic plates and bowls, a ceramic pestle and mortar, unusual condiment dishes, characterful silverware, textured hand towels, cheesecloths…the list goes on.
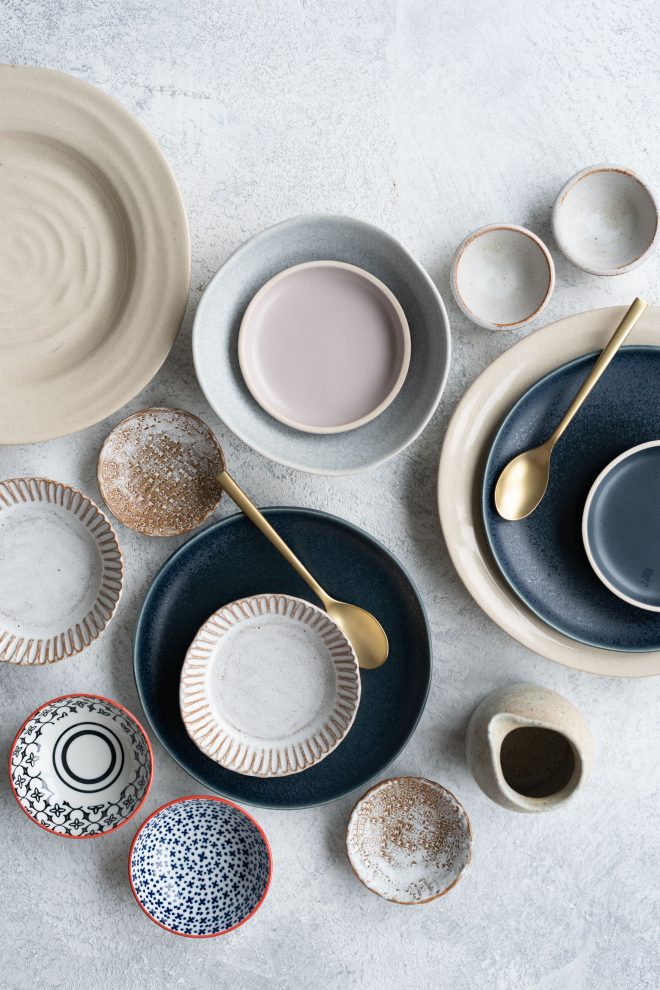
As with backgrounds, you can really get creative with sourcing props, and I have a lot of fun digging around in flea markets and junk shops for unusual items.
But you might just as easily find inspiring props in dedicated kitchen and design stores – either brick and mortar or online. Of course, before you go spending any money on new props, the first place to look is in your own kitchen, which will likely already be full of potentially useful items.
Storage
What will likely have become apparent by now is that shooting food photography tends to involve a lot of “stuff.” In fact the line between food photographer and compulsive hoarder can be an extremely fine one indeed.
You can certainly get away with shooting food photography with only a bare minimum of equipment, but the more gear you have, the more options you have (which in itself can be both a blessing and a curse).
Whether you’re a rigorous adherent to the clutter-free lifestyle, or an out and out accumulator, some equipment will nonetheless be necessary. But this equipment will only be useful to you if it can be accessed easily whenever required.
Indeed, there’d be no use in having the world’s most impressive collection of food photography props if you can never remember where a particular item is when you actually need it.
If you’ve got a whole room of your home that you are using as a dedicated studio space, this already makes things a lot easier. If it also happens to have a walk-in closet that you can use as an equipment store, well lucky you! Failing that, a couple of decent sized cupboards, wardrobes or shelving units can really help to get the clutter organised and out of view.
Personally I love open shelving as everything is easy to organise and fully accessible
If mobility is important – either because you need to follow the light around the house, or because your studio space also doubles as, say, the guest bedroom – then it could be a good idea to keep your gear on a utility cart or two.
Like the moving kitchen island I mentioned above, a utility cart can help to keep all your gear organised while allowing you to easily bring it to where it’s needed (and then take it away again once you’re done shooting).
For example, one cart could be used to store everything from flash equipment, lighting stands, and modifiers, to placing your laptop on when tethered to the camera. Meanwhile a second cart could hold all your props and backdrops.
Final Thoughts
This brings us to the end of this four-part series on putting together a home food photography studio. If you haven’t already checked out the other posts in this series, part 1 considers which part of your home will make the best option for shooting in; part 2 looks at the most basic essential equipment that every photography studio needs to have; and part 3 takes a look at lighting equipment.
Got any home photography studio tips of your own to share? I’d love to hear them in the comments!
are the backgrounds in the picture from Deco to Solution??? they look like..
No, they are all from Capture by Lucy 🙂
As a complete beginner I do need backgrounds so will be looking at the vinyl ones for simplicity, especially for the table top. For vertical backgrounds to go behind the subject I am going to start scrounging items and, possibly, spraying some foam boards or just wet mixing acrylic paints to get mottled backdrops.
This series has been a great help to me so thank you so much
That’s amazing Graham, I’m so happy this has been useful for you