


Before we start, I want to be clear: I would never encourage anyone to blur the backgrounds of their photos in post production other than as an absolute last resort. When you know how to use your camera properly, achieving a nicely blurred background through controlled use of depth of field is extremely easy. So if you want your backgrounds blurred, there’s no reason not to do it in-camera right from the start. And the result is always going to be far superior that way.
However, by coincidence a couple of people have recently asked me about blurring backgrounds. And I can imagine that if you’re really in a pinch with a less than perfect shoot, knowing how to create a blurred background at the editing stage might just save the day. For this reason I’ve put together an in-depth guide explaining how to blur backgrounds using Lightroom. For emergency use only, mind!
And if you want to speed up your Lightroom Workflow, then download my free Lightroom Hotkeys guide!
But Where’s the Blur Tool?
On first inspection it might appear that it’s not possible to blur the background of a photo in Lightroom at all. Unlike with some more advanced photo editing software, there is no dedicated Blur tool.
But as is often the case with photo editing, almost anything is possible if you’re prepared to put in the effort to find a workaround. And as it turns out, in Lightroom there are actually several ways of achieving a blurred background effect.
I’ll go through the steps of what I think is the most simple and effective method of blurring backgrounds in Lightroom in a minute. First though, in order to do a good job of it, I want to make sure that we’re prepared.
Why Use Lightroom to Blur the Background of a Photo?
As I already said, it’s always going to be better to get your backgrounds blurry simply by shooting with a shallow depth of field. For a start, it’s much quicker that way.
Aside from this, though, the main reason for not trying to do it in Lightroom is that, if you are not careful, you can end up making some suspect editing choices that totally give the game away.
Nonetheless, we all make mistakes from time to time. And once a shoot is over it can be very inconvenient (not to mention expensive) to reshoot. Here fixing the problem in post is probably going to be the best course of action – as long as the cure isn’t worse than the disease.
Thankfully, though, it is possible to do a good job of blurring the background in Lightroom. But to avoid making your photo look fake, you’ll need to approach the editing process the right way. And this has as much to do with how well you understand camera lenses as it does with your mastery of Lightroom editing techniques.
Want to speed up your Lightroom Classic workflow? Grab my FREE Lightroom Hotkeys guide now!
How to Subtly Blur a Background in Lightroom
In order to successfully blur a background in Lightroom, it’s not enough to simply know which Lightroom tools to use. You also need to understand how background blur works when it occurs naturally in a photo.
As you probably know, there are three elements that contribute to creating a blurred background when shooting:
- Lens focal length; a longer lens will blur the background more than a wide angle one
- Lens aperture; a wider opening will produce more blur than a small one
- Relative distances between camera, subject, and background
If you don’t have a solid grasp of how these elements collectively impact depth of field, you’ll risk editing your images in a way that defies the laws of physics. More importantly, the result will look totally unnatural.
Want to brush up on depth of field? Look no further than my guide to depth of field for food photography.
When Background Becomes Foreground
When considering how to blur the background of a photo using software like Lightroom, part of the challenge is simply understanding which parts of the image we need to blur and which should remain sharp.
From this point of view, portraits are often easier to fix than food photographs; particularly head and shoulders shots. This is because, even if a portrait photographer has used a fairly slow aperture, there is likely to be some separation between subject and background due to the two being positioned on different focal planes. Here the background and foreground are two distinct areas, and all that needs to be done is to artificially increase the degree of separation between them. With a simple portrait of this kind, you could mask the subject and then apply a blur effect to the rest of the image. Done.
But with food photography, the difference between background and foreground is often less clear. Indeed, in food photography the background and foreground frequently intersect on the same focal plane at a certain point. This makes things a little more complicated.
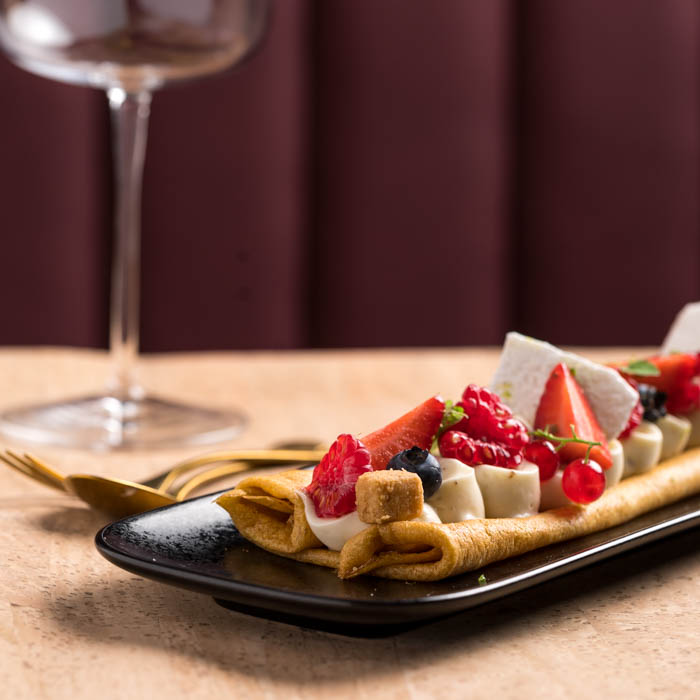
Imagine you’re shooting a dish on a table from a forty-five degree angle. In this scenario, the more distant part of the table top behind the subject would naturally be blurred. The part of the table directly under the subject, however, is on the same focal plane as the subject. So this part of the table would be just as sharp as the subject, with a gradual transition to blurriness as the table recedes into the background.
In a shot like this there is no clearly defined frontier between those areas that need to remain sharp and those that we would want to blur. In such a case, simply masking your subject and blurring everything else around it will not look at all convincing. Instead you need to respect the way that background blur works in real life; with sharpness gradually decreasing the further an object is located from the main point of focus.
With that important point in mind, let’s see if we can figure out how to realistically blur the background of one of my photos using Lightroom.
Blurring a Background in Lightroom; Step by Step Instructions
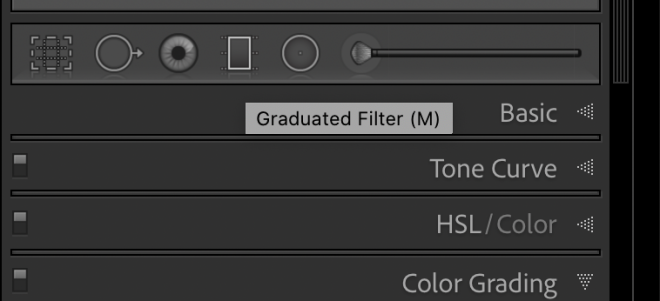
- Load your image into Lightroom and open a Graduated Filter (M). You can use the “O” key to toggle on and off the mask preview so you can see what you’re doing.
2. From the bar at the top of the image, pull down the preview lines that show where the graduated filter will start to take effect. There are three lines. The bottom one indicates where the filter’s effect is at zero; the middle one indicates 50%; and by the time you get to the top one, the filter is at 100%.
3. Move these lines around so that they are positioned where you want them over your image. On our sample image, we want the background to be fully blurred, so we’ll place the top (100%) line there. But the part of the shooting surface that is right under the subject should be sharply focused, so the bottom line (0%) goes over the dish, just after the main point of focus. Then we can choose where we want the 50% mark to be. In this case it looks pretty good placed right on the table to create a sharp line.
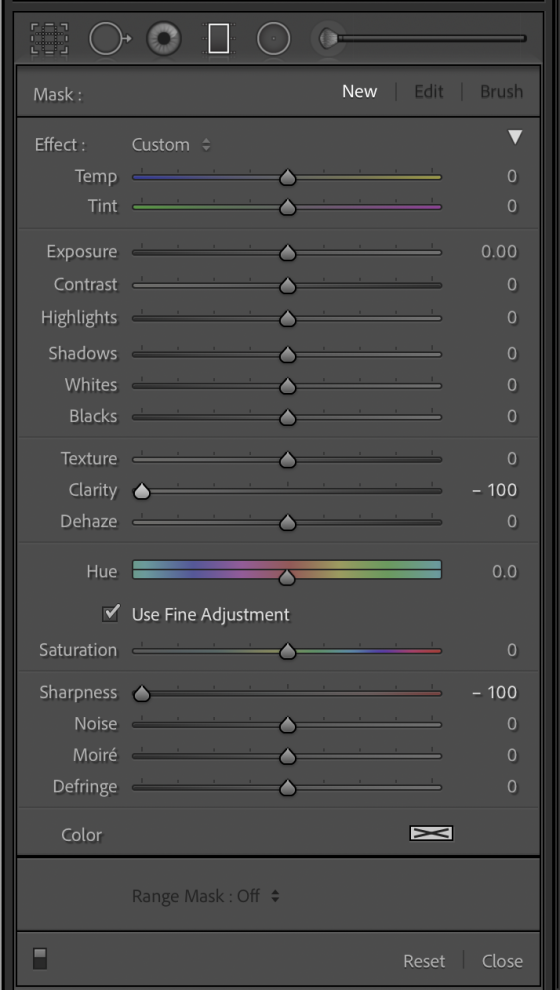
4. Now go down to the Clarity and Sharpness sliders on your Graduated Filter controls, and move them all the way to the left, so that they are both set to -100. Flick the preview switch at the bottom of the effect window to check how it looks, then adjust Sharpness and Clarity to taste if necessary.
Of course, this has blurred the entire mask now, including the wine glass. So the next step is to go back in and recover the sharpness on our dish.
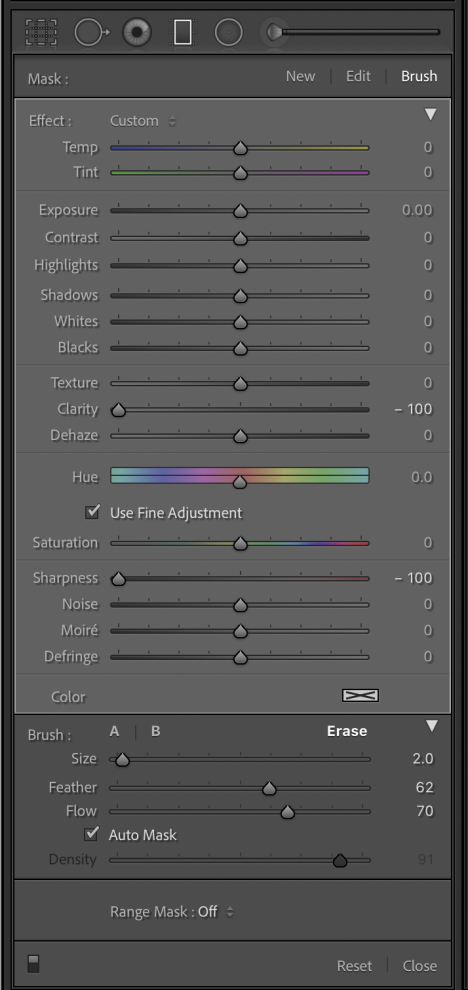
5. To do this, first go up to the top of the Graduated Filter window and click on where it says “Brush” to the right. This will reveal the brush controls down below within the effect window. Check that the Brush is set to “Erase” and then select the Auto Mask box. This makes sure that the brush works more intelligently, distinguishing between objects at the centre and periphery of the brush. Now you can more easily select which areas will be effected by the Graduated Filter without having to be super precise about where you erase as you go around the edges of your subject.
6. Turn on Overlay (O) to see exactly where you are erasing, and then trace over the edges of the subject, paying particular attention to get the edges sharply back in focus without erasing the blur from the background. This part of the process is the most time consuming and will take a lot of patience if you want to do a good job.
Once you’re done with the erasing, switch off the Overlay and take a look at the result. Touch up any parts you may have missed or where you’ve accidentally erased some of the desired blur effect from the background.


Not blurred enough? No problem; you can simply add a second copy of your Graduated Filter by clicking the little handle on the central line and selecting Duplicate. Now you’ve got twice the blur!
Want my top tips for making your Lightroom Classic workflow more efficient? Then grab my free Lightroom Hotkeys guide below
Final Thoughts
As you can see, it is possible to blur the background of a photo using Lightroom. And if you keep things fairly subtle, the results are often not that bad. Certainly good enough to hide all but the most distracting background details that might be ruining a shot.
However, blurring a background in this way is not a realistic alternative to doing it in-camera. Anyone with an expert eye would likely be able to tell. And you certainly shouldn’t expect to achieve the kind of bokeh effect produced by a high quality camera lens; Lightroom is no substitute for expensive optics. So if you want to know how to blur the background of a photo well, the answer is always going to be that you should do it as you shoot!
Thank you for sharing this tutorial; it is simple to understand. Please continue to share more tips.