


Today, we’re going to focus on focal points (har har). Bad joking aside, choosing the right focal point in your food photo is one of the most important things in your composition. In today’s post, we’re going to look at what a focal point is, how to decide which subject should be your focal point, and how to control the rest of your photo for that perfect amount of background blur to highlight your focal point at its best.
Focal Point
In short, the focal point is the most important part of the image. In food photography, our focal point is normally our main dish, which is placed in the frame and supported by secondary subjects.
It’s important that the focal point of your photo is the most in focus part of your photo, as a blurry focal point creates a frustrating, incohesive image.
Composition
When looking at a photo, the viewer’s eye is drawn to the brightest, most in focus point of a photo first, so it’s important to make your focal point, the most important subject in your frame.
Don’t confuse that with meaning that your focal point always has to be your main dish/recipe – it depends on your composition as to what your main subject should be.
For example, your main recipe may be a loaf of bread, but you may take a photo highlighting all the jams and condiments, making a jar the most important subject in that composition.
Once you’ve decided what the most important subject is based on the story you are telling in your image, use compositional techniques such as the rule of thirds or the golden ratio to place your focal point in a powerful part of your frame and frame it with your secondary subjects and props.
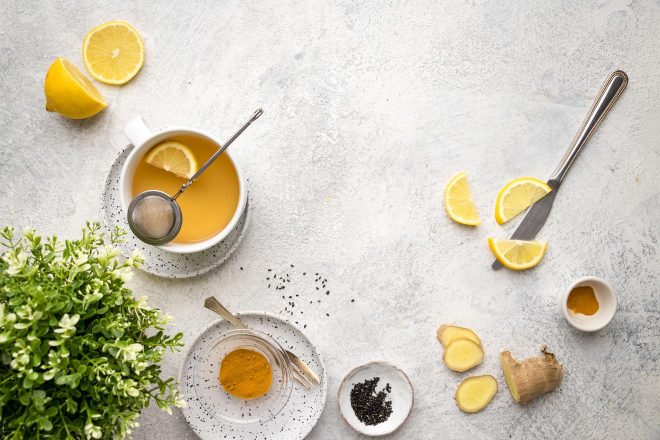
(In this photo, I’ve used the golden spiral as a compositional technique, and placed my main subject, the tea, on the eye of the spiral)
Related: Using compositional techniques in food photography
As a rule of thumb, remember the following:
Most important subject = focal point
Capturing Image with the Right Amount of Blur
Once you’ve set the composition for your food photo, with your focal point nicely framed, we can move onto the next step, which is framing your focal point using focus.
When you see photos with a blurry background and/or foreground, it’s more than just a pretty effect. It’s a powerful way to draw attention to the focal point, allowing the background and foreground to act as a passive space to frame your main subject.
In order to create the right amount of background and foreground blur in our food photos, we need to understand the different elements that create this effect.
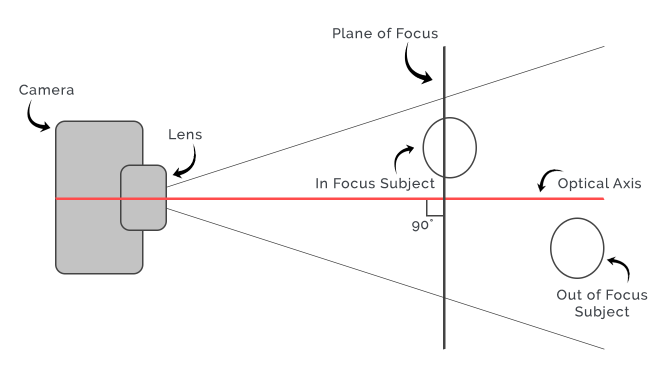
Depth of Field
The depth of field (DoF) is the distance between the nearest and farthest objects in a scene that appear acceptably sharp in an image. The plane of focus lies within the DoF. On one lens, a wider aperture (a lower F-Stop number), will create a shallower depth of field than a narrower aperture (higher F-Stop number).
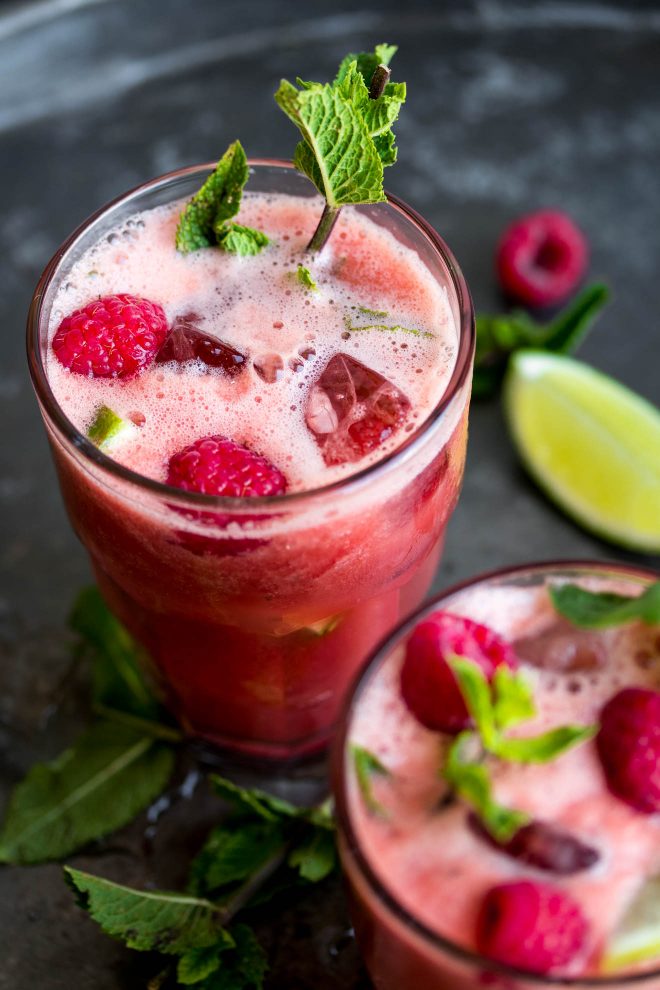
(In this photo, you can see how the background behind the main drink is blurry, and also how the secondary subject in the foreground is also blurry. Both fall in areas either side of the DoF)
Plane of Focus
The plane of focus is an imaginary plane that lies parallel to the camera’s sensor. The plane represents the most in focus point within the depth of field. It always lies perpendicular to the optical axis. Your focal point should lie on the plane of focus, as it’s the most in focus part of your frame.
The position of the plane of focus is adjusted closer and further away from the camera’s sensor as you adjust your focus ring.
Next time you do a shoot, flip your camera to manual focus and adjust the focus ring and observe how the plane of focus moves backwards and forwards in your frame.
In this diagram example, the main subject is placed on the plane of focus (the focal point), and a secondary subject is placed in the background, which will mean it lies in the “bokeh” area of the photo.
Setting your Background and Foreground Blur
Adding blurry background to your photos can be a powerful tool in helping your main subject (which should be your focal point!) stand out. It leads the eye to a natural resting place, allowing the rest of the photo to complement the main subject without causing a distraction.
There are three things that affect background sharpness, and those are:
- Aperture
- Focal length of lens
- Distance between subject and background
There is much misconception that the F-stop number is the only thing that affects how blurry the background of your image is, whereas it’s actually a combination of all of these things.
Here’s an example. In this photo, I took a photo of the same loaf of bread in exactly the same position on 3 different lenses. I re-positioned myself so that the bread stayed roughly in the same place and at the same size on all three lenses.
All three photos are shot with an aperture of f/3.2. You will see that the longer the focal length, the more pronounced the bokeh effect is. So if you wanted to achieve the look of the 100mm on the 28mm lens, you’d need to use a lower F-stop.
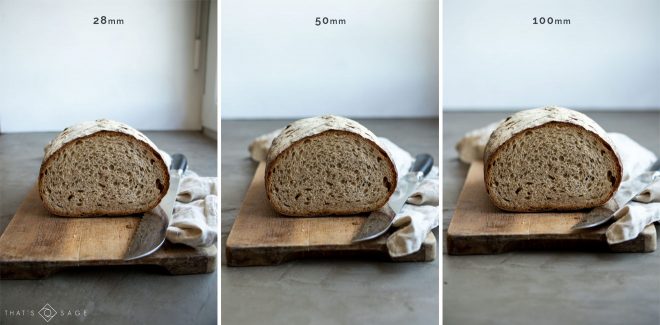
When selecting your focal point and aperture, bear in mind all three of these factors. If you change the focal length of your lens, the relative amount of background and foreground blur will also change.
Related: Choosing the right lens for your food photography – Focal Length
Examples
In this shoot, I combined all of the techniques above to decide on the focal point and choose my compositional techniques and aperture accordingly, let’s jump in.
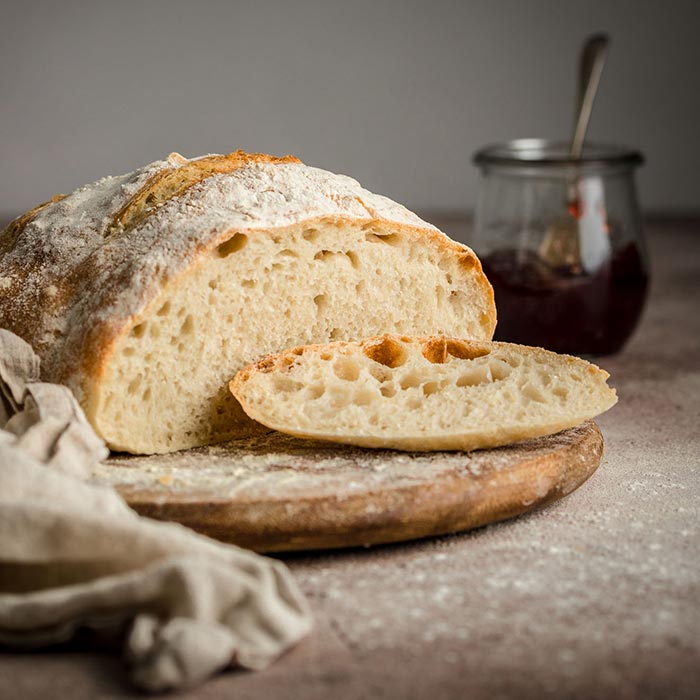
Straight on Camera Angle
When shooting with a straight on camera angle, it’s important to create a depth of field that’s long enough for most (if not all) of your main subject to be in focus.
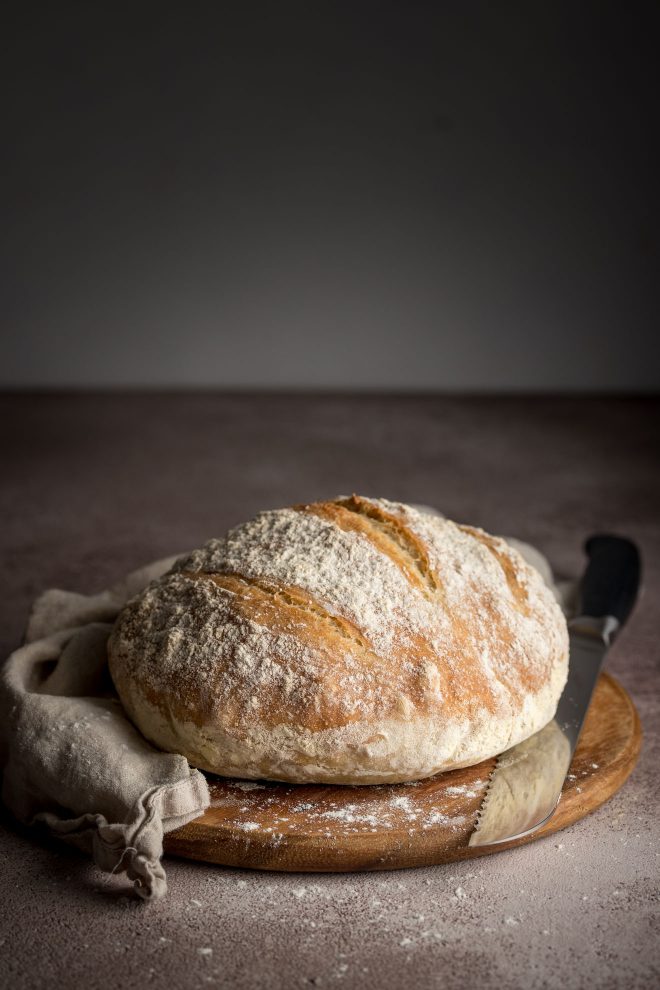
In this loaf of bread, I used a 96mm equivalent focal length lens (a 60mm on my 1.6x crop frame camera), and an aperture of f/4. This has allowed the background to be nicely blurred, while keeping the majority of the bread in focus.
I used the golden ratio to compose this photo, with the “horizon” in the background falling along the top intersect, and positioned my bread at the points the lines cross.
I positioned the plane of focus at the front of my bread where the most detail is, which is also a point the lines cross in the golden ratio.
I then used the radial filter in Lightroom to create a vignette around the bread, making the bread the brightest area of the photo, further allowing it to stand out at the focal point.
Top Down Camera Angles
In top down shots (also known as “flat lays”), you want to create a wider depth of field, so that everything in photo is relatively evenly in focus.
In this shot, I used an aperture of f/5.6, which has allowed the whole loaf of bread to be in focus, with the cloth just starting to gently fall out of the DoF.
Choosing the Correct Focus Point
Take the term “correct” with a pinch of salt. As with any kind of art, there isn’t really a right or wrong way to do things, but there are certain guidelines which makes photos more visually pleasing than others.
In the example below, in ever way, the bread is the focal point. It’s the largest subject in the frame, the brightest, and is placed within the composition where you’d expect a main subject to be.
The difference between these three photos is purely where the plane of focus has been placed. You will see in the middle photo (where the focus is on the bread), that the composition is cohesive, visually pleasing and allows the bread to stand out. Whereas in the other two examples, where the focus point is set to a secondary subject, the composition suddenly feels awkward, and you feel like you’re just looking at an out of focus photo.
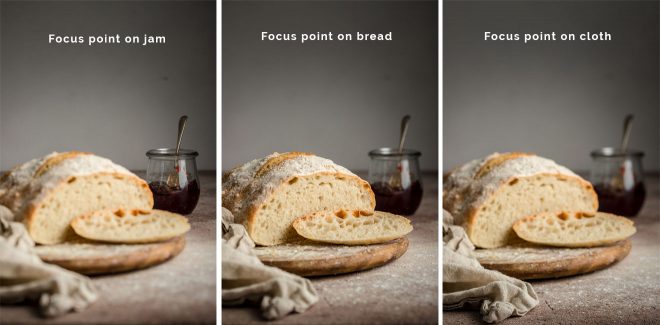
With the focus on the bread, we have a nice contrast of background and foreground blur, leading the eye nicely through the composition.
Summary
- The focal point of your photo should be the most important subject in your frame.
- Use compositional techniques to help you place your subject in a powerful position and use other elements to frame it.
- Use background and foreground blur as another technique to frame your focal point
- This blur is controlled by aperture, focal length and relative distances in your scene
Simple yet very informative. Thank you for this.
This is such a short but extremely helpful tutorial. Thank you
So glad you found it helpful Jabu
Thanks a lot for this tutorial. Very well explained and I will be looking forward for more such posts
So glad you found it useful!
Great tutorial, Lauren – thanks for sharing;-)
I have a question: how do you make the raspberries float on top – any help supplies or just very fast at taking the image after putting them in the drink (which drink is it by the way, it looks SO good…;-)
Kind regards,
Susanne Geert
Hi Susanne! I find the raspberries float on their own as they are less dense than water!
Great post! I am working to better my ability to use depth of field in my food shots. I especially resonated with the golden ratio and horizon line as I tend not to use those lines as much as I should. Excited to use this tactic moving forward!
Amazing! I love using that technique with the horizons, so simple but very practical. Can’t wait to see what you shoot Scott!