


If you’ve been shooting food photography for any amount of time, you’ve probably heard that “you should be shooting in manual mode”!
But switching off auto mode and turning the dial to that little “M” can be pretty intimidating, and is manual mode really necessary to create great food photography?
Well, that’s what we’re going to look at today!
What is Manual Mode?
Before we really get stuck in, let’s take a minute to recap what manual mode really is.
Manual mode is the most powerful, and most customisable program your camera has. It allows you to control aperture, shutter speed and ISO independently. These three things together make up the exposure triangle and control how bright or dark your image is.
Each one works in a different way, controlling how much light hits your camera’s sensor, and each of them carry different qualities that aren’t just about light.
So why would you bother learning to use manual mode when your camera will do all of this for you on auto mode?
Because manual mode is going to give you ultimate control over your camera and your photos. There is only so far you can go with auto mode.
But if you’re at the beginning of your photography journey, or you’ve dabbled in manual mode but given up because it’s just too overwhelming, then don’t fear. Learning how to use manual mode is kind of like starting an exercise routine… let me tell you why…
You know the health benefits of getting fit and working out regularly will be worth it in the long run, but if you currently don’t exercise at all, you’re not going to start training for an hour a day 6 days a week from day 1. That’s going to leave you burned out, over tired, and potentially injured. And you’ll probably stop exercising altogether and be back at square 1. Instead, you’re going to start with 10 minutes a day, easing yourself into it, letting your strength build gradually until you’re fit enough to do whatever you feel like doing!
Manual mode is kind of the same thing. There’s no doubt that in the long run the benefits of using manual mode will always outweigh auto mode, but if you’ve just picked up a DSLR or you don’t really know the technical ins and outs of your camera, manual mode can be a bit much.
So instead, your camera has settings all the way from auto through to semi-automatic and then full manual so you can approach it like a process.
In my free, 5 day e-course, Manual Mode Essentials, we are going to go step by step through the exposure triangle and then practise each part in the semi-automatic modes before going onto full manual mode!

Free E-Course
Learn Manual Mode in 5 days flat!
Learn Manual Mode in 5 days flat!
What are the benefits of shooting in manual mode?
Creative Control
We already know that the exposure of your photo is controlled by the three things in the exposure triangle, aperture, shutter speed and ISO, but these don’t JUST control the light getting onto your camera’s sensor.
Aperture: Also controls the depth of field in your image (that blurry background effect? That’s controlled by aperture)
Shutter speed: How fast or slow your shutter speed is can completely change the look of your photo when you’re capturing an action, so if you’re trying to take that perfect pour shot, you need to know how to set your shutter speed.
ISO: Increasing your ISO will brighten your image, but it will also increase the amount of visible grain in your photo, which may be an effect you’re going for (or not). So knowing how to adjust your aperture and shutter speed to accommodate the ISO you want is key.
Your camera only adjusts your settings in auto mode based on light, not on the creative effects of aperture, shutter speed and ISO. And honestly? You are more clever than your camera! Your eyes are far more powerful than the light meter inside your camera, so don’t hand over that power to your camera, learn manual mode so you can make these creative decisions yourself.
Consistency
When you’re working in auto mode, your camera is going to adjust your settings every time you press the shutter release depending on what the light meter is telling it at that moment in time.
This means you could walk out of your food shoot with photos with slightly different exposures, and this is going to make your editing process so much longer than it needs to be.
When you shoot in manual mode, you decide the settings, and they only change if you change them.
In this example, I took two photos of the same scene, in the same position using the same light, one in auto mode, and one in manual mode. When I put my camera in auto mode, it decided that my shutter speed should be faster, and therefore raised my ISO to 1000 to compensate. This resulted in a well exposed image, but when you zoom in, you can see this visible grain on the image, which results in a far less sharp, lower quality image:
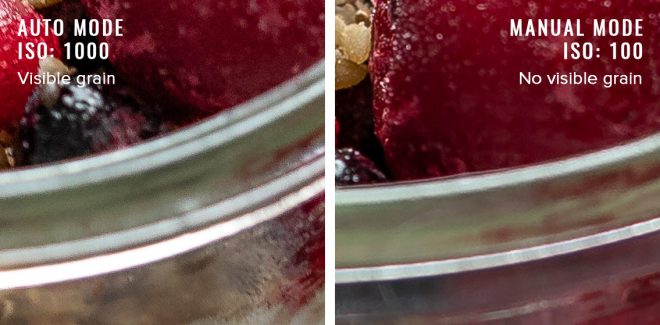
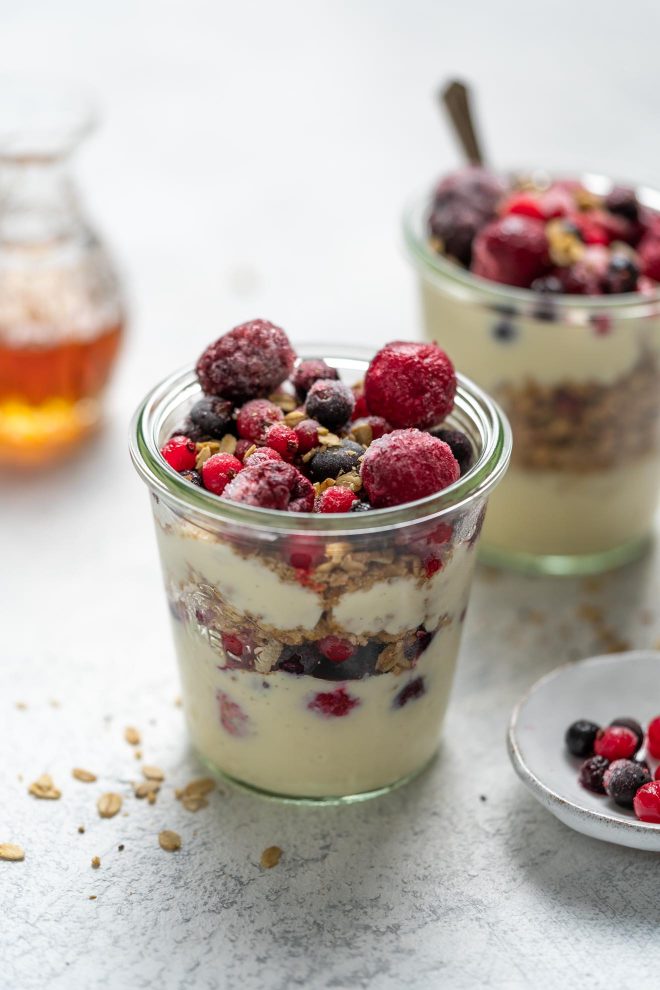
By shooting in full manual mode (with a tripod), I am able to fully control my camera to get the exact look I want and bring my creative vision to life. Here’s the result of this shoot:
Settings:
ISO:100
Aperture: f/2.8
Shutter Speed: 1/15
How to get started shooting in Manual Mode
Firstly, know that mastering manual mode takes time. You’re not alone if you don’t “get” it all straight away (I certainly didn’t), but you will get there, and if you stick with it you’ll be clicking away like it’s second nature in no time.
The best place to start is to really understand what exposure is, and how it’s affected by aperture, ISO and shutter speed. Once you have a real understanding of this foundation, everything else will fall into place nicely on top.
Next, practise shooting in semi automatic modes (aperture priority and shutter priority). These are going to help you by allowing you to control just one setting at a time, allowing your camera to do the rest. It’s a great way for you to start understanding the impact changing each of your settings has on the other settings, as well as the creative look of your photo.
In my free, 5 day e-course “Manual Mode Essentials”, we’ll go step by step through all of this. I’ll take you day by day through each of the settings, breaking it down into detailed (but concise) lessons, to help get you going in manual mode in just 5 days. There are plenty of examples for you to follow and activities for you to put it all into action!
Join over 1,000 other students in Manual Mode Essentials today!
Free E-Course
Learn Manual Mode in 5 days flat!
Learn Manual Mode in 5 days flat!
So let’s have a quick recap. Manual mode is the bomb. Yes, it’s a bit complicated, but the long term benefits of really understanding how to take control of your camera are going to unlock your creative vision and allow you to make it a really.
You are far cleverer than your camera, so don’t hand over your creative super powers to a hunk of metal and glass.
And if you’ve not taken the leap yet, or you’re still not 100% confident with manual mode, then join over 1,000 other students in my free, 5 day e-course, Manual Mode Essentials!
Can I shoot Raw in Auto setting with my Nikon D7200 camera.
Hi Carole, you sure can! You need to find the image format section in your menu then change it from JPEG to RAW. Then you can go ahead and shoot in Auto mode but still have RAW files 🙂
Can’t wait to get started. Just by following your tutorials online my photography is taking a turn for the best for future. I am here for the long run.
Thank you very much Lauren.
Kind regards
Annelien Pienaar
South Africa
SO thrilled to hear that Annelien!