


Welcome to the last part of our food photography GIFs series! In this part it all comes together to export and start sharing your creation with the world!
If you want to watch our GIF video that covers this entire series, you can do that below!
Export Options
You have two options here in terms of the file type you’re going to export, and largely which you choose depends on your needs and how you intend to use the GIF itself. Because GIF’s contain so many photos, the file sizes can become large and unmanageable really quickly. The two file types available are:
Mp4
This is a video file format. It has a higher quality than a GIF file, but can have a huge file size depending on how many images are in your GIF, and what the resolution is. Because it’s a video file, it also has a start and end point, and therefore doesn’t loop or play automatically. You’ll need to make sure that where you’re embedding the video has the ability to do that.
GIF
This is the more traditional, GIF file format. They are typically smaller than an MP4 and are an 8-bit file type meaning they have less colors available by default. GIF files are able to play and loop automatically and you can choose this option when saving. The quality is typically a bit lower, but you’ll have some options when saving via a process called “dithering”, which can help us replace some missing colours.
Learn how to use manual mode confidently in less than a week, join our free course using the link below

Free E-Course
Learn Manual Mode in 5 days flat!
Learn Manual Mode in 5 days flat!
When to use which file type
Website/Email
In this situation, you’ll want to be using a GIF file. You’ll see in my portfolio site, I include a few GIFs, and this automatically loops and play because they are a GIF file.
A note on email: I tend not to share my own GIFs in emails because even at a low resolution, GIFs are typically quite large files that tend to be more likely to end up in spam. So if you are exporting a GIF for an email, make sure it’s at a really small resolution to avoid this.
Instagram/Facebook/Twitter
Here you want to choose a .mp4 file. On these platforms, we want the highest quality we can get, and they are set up to autoplay and loop anyway, so we don’t have the usual constraint.
Exporting an MP4
Let’s start with the more straightforward export option, an Mp4. To export your video file, go to File → Export → Render Video.
From here, simply name your file and choose the location where Photoshop should put the video.
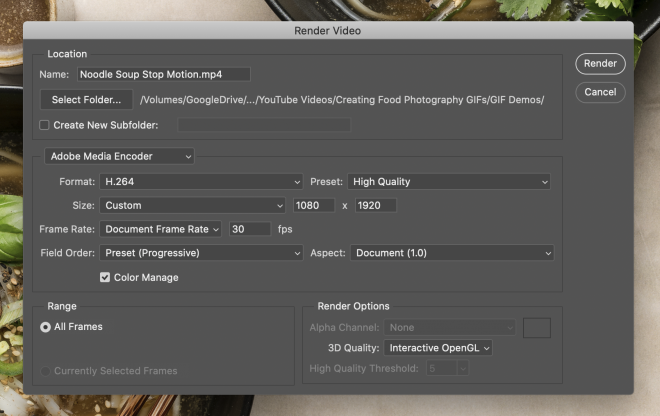
Next, choose the dimensions of your video. Important: You should have already exported your images at the resolution of your final GIF, so you shouldn’t change the aspect ratio here, otherwise you’ll end up with a squashed-looking GIF.
We talked about this more in Part 2, but as a reminder, here are some common aspect ratios:
1080 x 1080px – Square suitable for all social media
1080 x 1350px – Instagram Portrait for feed (this is my most recommended size)
1080 x 1920px – Vertical format for Instagram/Facebook Stories, Reels, and TikTok
The format of your video should be H.264, and use the High Quality preset for ease.
Hit “render”, let Photoshop do it’s thing, and you’re good to go!
Exporting as a GIF file
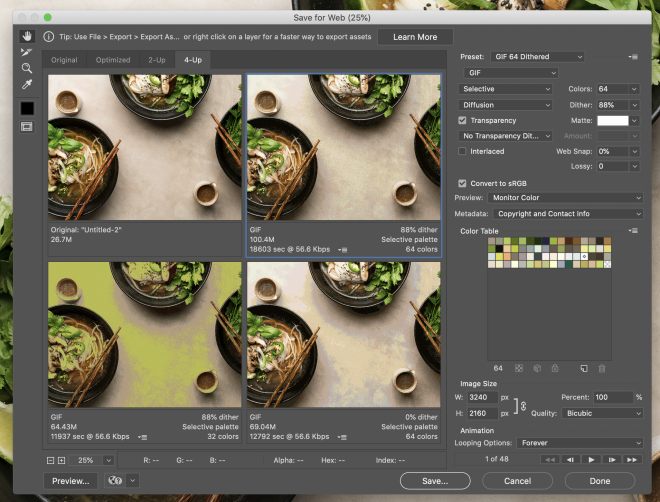
To export a GIF from Photoshop go to File → Export → Save for Web. Then make sure you have “GIF” selected in the file format dropdown.
Dithering
Before we jump into the export process of a GIF file, we need to talk about a technique called dithering. As we already touched on, GIF files are 8bit files, which means they have the ability to display 256 colors. A 24-bit display on the other hand can display up to 16 million colors. That’s a HUGE difference… so how do we replace some of the missing colors in a GIF file? This is where dithering comes in.
Dithering is a process of simulating colours that can’t be displayed. The higher the level of dithering in a GIF, the more true to the original photo the GIF will look, which also increases the file size. A lower level of dithering creates a lower file size, but also a more low quality image file.
Which level of dithering to use depends on the end goal of your image. Normally when I’m exporting a GIF file, it’s to use on a website, therefore I don’t want a huge file size, so I will have to compromise a little on quality, to get a balance of a GIF that looks good, but also isn’t too big to run.
Set the Size
Again, you only want to export a GIF file at the size at which you want to use it. Any bigger than you need and you’re only inflating the file size more than you need.
Set the loop setting
Normally, this will be “forever”, then your GIF will autoplay and keep playing.
Choose the save location
Hit “Save” and choose the save location of your GIF.
Sharing your GIF’s
Once you’ve exported your mp4 or GIF file, you’re ready to share it! That’s the fun part! For social media, upload your Mp4 files, and on websites or emails, use your GIF files.
What GIFs are you excited to create?
Enroll in Manual Mode Essentials now!
Like it? Share the love!