


DSLR camera’s are pretty smart these days. They come with a whoooole host of fancy features, settings and buttons that tell us a lot about what they can do. But do you know what’s smarter than your camera? YOU.
You could have the fanciest, most powerful sensor in your camera, and it will still never be as powerful as your human eyes and brain. So when you hand over control of your food photography to your camera (by using auto mode), you’re handing over the creativity, vision and power to your camera too!
Don’t do that…
I truly believe that one of the MOST powerful things you can do for your food photography is learn how to use manual mode. Just imagine how much your food photography could SOAR once you know how to do exactly what you want to with your camera.
Once you’ve nailed your food styling and have your set setup exactly how you want it, you want to do that justice by getting the best possible picture on your camera, right?
Related: My TOP 5 Food Styling Tricks
Using manual mode allows YOU to have creative control over your work, and as you keep using manual mode over and over and over again, you’re going to learn more about the details of what your camera can do, and harness all that power to produce KILLER food photos that stand out.
When I started to consistently use manual mode, and force myself to push through that technical side of photography and really start understanding my camera, I started to see dramatic improvement in my food photography. Suddenly, I was able to control my photos in a way I never had been before, and I started seeing my creative vision materialise. I’ve never looked back.
By using manual mode, you’re going to exponentially improve your food photography, break down all the barriers that you feel your camera is holding you back from and unlock all the potential inside you (and it’s not even going to be that hard, I promise).
In this post, we’re going to cover the basics of:
- ISO
- Aperture
- Shutter Speed
- How to put it all together and start manual mode NOW
But before we jump in, I just want to let you know about our FREE 5 day e-course “Manual Mode Essentials”. This email course will take you through each of these steps in detail, with daily activities and examples, to really give you the kick start you need. It’s the perfect complement to this blog post.
We’ve already got over 200 students (!!) in this course, so if you haven’t already jumped on board – what are you waiting for?!

Free E-Course
Learn Manual Mode in 5 days flat!
Learn Manual Mode in 5 days flat!
The Exposure Triangle
Before we jump into how to use manual mode for food photography, we need to understand what exposure really is.
It’s much more than just how light or dark your photo is. Exposure is controlled by three elements; Aperture, ISO and shutter speed. It looks something like this:
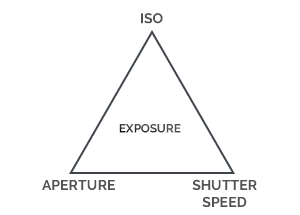
All three of these elements work together to determine the exposure of your photo. You can’t adjust one without affecting the other, so it’s kind of a balancing act, but a very logical one.
Understanding how each element interacts with the others is the key to using manual mode successfully – I’ll come back to that in the putting it together section below!
ISO
The ISO measures the camera sensor’s sensitivity to light. A lower ISO represents less sensitivity, and will result in finer “grain” on your photo. Likewise, a high ISO will help you raise the exposure in a low light situation, but results in lots of visible grain on your photo.
For food photography, I recommend keeping your ISO at 200 (or less). By using a tripod and remote shutter, I’m able to get great quality photos all the time, because I’m using the shutter speed to control the exposure, not the ISO.
Aperture
Aperture is the setting used to control how much of your photo is in focus, and to create those dreamy blurry backgrounds.
Every lens has an aperture ring inside. You can adjust how “wide” open the aperture ring is in your camera settings. This is measured in f-stops. A lower f-stop number represents a wider aperture, and a higher f-stop number represents a narrower aperture. So f/1.4 is a wider aperture than f/8.
A wide aperture creates a shallower depth of field, meaning that less of your photo is in focus. This creates that blurry background effect (also known as “bokeh”), and when used right, creates swoon-worthy food photography!
Wider apertures are ideal for straight on shots where you really want your subject to stand out as the focus of your photo, and let the background just act as an incidental, non distracting scene to compliment your food.
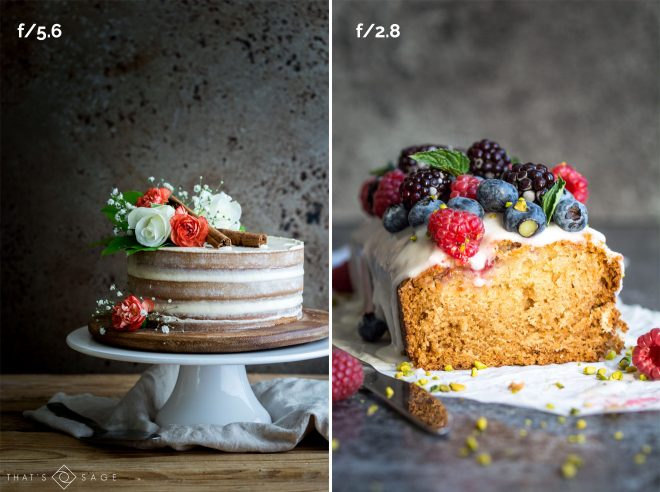
Higher apertures come in really useful if there’s more than one level in your food photography that needs to be in focus, such as a flat lay. I rarely shoot a flat lay at less that f/5.6, otherwise it can be hard to get anything looking properly in focus.
For my food photography, I normally shoot somewhere between f/2.2 and f/5.6 – but of course there are some exceptions.
Here are some examples of aperture in action:
Shutter Speed
Your camera’s shutter is kind of like it’s eyelid. When you press the shutter release (the button to actually take your photo), the shutter opens and then closes again. The amount of time the shutter is open for is defined by your shutter speed, which is measured as fractions (or multiples) of a second.
For example, a shutter speed of 1/80 = an 80th of a second and a shutter speed of 2” = 2 seconds.
So how on earth do you figure out what shutter speed you should be using? Well, lucky for you, there’s actually a logic behind it, and it goes a lil’ something like this:
Wide aperture (a low F-stop number) = faster shutter speed
Narrow aperture (a high F-stop number) = slower shutter speed
Basically, if the aperture is wide open and letting in more light, you need to speed up the shutter speed to allow less light in, and if the aperture is narrow, you need the shutter open longer to let more light in.
How do all these things work together when using Manual Mode?
This is where we have to skip back to section one and remember the exposure triangle. Let’s walk through how I would set up a food photography shot using manual mode.
Step 1: Set your ISO to 100 or 200 – we’re not going to change this anymore to maintain as much quality as possible.
Step 2: Set your aperture. We now know that a wide aperture (a low f-stop number) creates more bokeh (blurry background) and also let’s in more light because the aperture ring is open wider.
Likewise, a narrow aperture (a higher f-stop number) creates less bokeh and let’s in less light, because the aperture ring is less open.
Think about the kind of shot you want to take and choose an aperture that will complement your shot nicely, allowing your subject to stand out.
Step 3: Set your shutter speed. Once you’ve set your ISO and aperture, your shutter speed is what you’re going to use to balance everything and set your exposure.
When you’re setting this, remember this rule:
Wide aperture (a low F-stop number) = faster shutter speed
Narrow aperture (a high F-stop number) = slower shutter speed
Summary
So there you have it, the basic steps to using manual mode for your food photography. If you want to go one step further with all of this, enroll in our FREE 5 day e-course “Manual Mode Essentials”.
In this course, we walk through the ins and outs of manual mode day by day, with small assignments each day to help you start putting it into practise. We’ve had over 3000 students in the course who are seeing AMAZING transformation in their food photography, so if you’re not already in – grab your spot now by signing up below!
Free E-Course
Learn Manual Mode in 5 days flat!
Learn Manual Mode in 5 days flat!
Your Turn
Go grab your camera and flick your settings over to the little “M” on the top. Set up a simple food scene and use our tips above to start taking some pictures! Play with one setting at a time and notice how the exposure of your photo changes. Once you understand how each setting interacts with the others in practise, you’ll be a manual mode whiz and absolutely slay-ING your food photography!
[…] Manual Mode: The Essential Camera Settings you need to know for your Food Photography (FREE 5 Day E-course) staging.foodphotographyacademy.co/… […]
Very helpful stuff. Thanks, all the pointers explained so well!!
I’m so glad Swati!
Great stuff! I’m just getting started and this is already been really helpful 🙂
I’m so glad Astrid!
Love how you break this down so simply, Lauren. Such a great resource 🙂
I’m so glad you found it useful Nisha!