


Knowing where to start when it comes to food styling is probably one of the hardest areas of food photography. While all the technical stuff to do with cameras might be challenging, there’s normally a black and white answer on how to achieve something… but when it comes to food styling, just like with any art, it becomes a lot more subjective.
But fear not! With just a few pointers, tips and tricks, you can start becoming more consistent in your food styling, so that you can confidently set up your food to look irresistible in your own personal style.
In today’s post I’m going to share with you my top five food styling tricks that I wish I’d known when I started food photography, so you can cut out all the trial and error and start seeing noticeable improvement in your food photography today!
When I started food photography three years ago, learning good food styling was something I struggled with a lot. I had a vision in my head of what I wanted to achieve, but things didn’t always turn out the way I wanted them to.
When I started to put these tips into practice with my own food photos, I really started noticing the improvement in my photography and I was able to find my own style that worked for me.
If you’re struggling with consistent food styling, or just wondering how you can start improving the look of your food photography, then you’re in the right place my friend!
In my food composition and styling E-Course “Food. Composed.”, I teach my ENTIRE food photography composition process from end to end. This program has everything you need to become a food styling pro, and start producing incredible, stand out food photos. Learn more about Food. Composed. here.
For now, let’s jump right into my top 5 food styling tricks, and if you’re a keen bean, sign up below and I’ll send you ANOTHER 5 exclusive food styling tricks, absolutely free!
1. Plan out your Composition
When you think about food styling, if your brain jumps straight to the actual food on the plate, then it’s time to take a few steps back. Why? Food styling starts with good composition, and good composition is much easier when you plan the layout of your photo.
Good composition will help your food photos look thought out, considered and altogether more professional. Your pictures will stand out on Pinterest because you’ll be able to let your food shine, and therefore drive more traffic to your food blog.
When thinking about composition in food photography, there are a few rules you can use as guidance. The two main composition rules I use are the rule of thirds, and the golden ratio. It’s worth bearing in mind that these “rules” are just guidance, and can be broken, but I always like to think of these as my foundation, and then work from there as I build my food photography set.
This kit will help you understand how you can apply these composition rules to your food photography, and start improving straight away!
In the examples below, you can see how the food is largely kept to where the lines would cross in a rule of thirds grid. This creates a balanced look with nothing distracting your attention from the main feature of each photo.
2. Using Colour Theory to Create Interest
Food styling trick number two is all about colour!
I feel like most of the recipes I shoot fall into one of two categories:
- Beautiful, multicoloured food that looks good whichever way you look at it
- Boring, monotone food (think, all brown pasta, or a brown cake) that looks drab in every photo you take, EVEN though it’s probably the most delicious thing in the world.
So category number one doesn’t cause us too much of a headache, but what do you with number two?
Well, this is where a little bit of colour theory comes in. Colour theory is based on where colours fall on the colour wheel. Here’s a basic version of the colour wheel:

On a very high level, there are two kinds of colour pairings that work well. Complementary and analogous. Complementary colours fall opposite each other on the wheel, and analogous colours are next to each other.
An easy food styling trick when you’ve got a dish that’s pretty much one colour, is to use your garnishes in a complementary colour from the main colour of your dish.
This could be with green herbs on a red/brown dish, or some blueberries and blackberries on a lemon cake. Of course, keep your garnishes to things you would expect to eat with the dish!
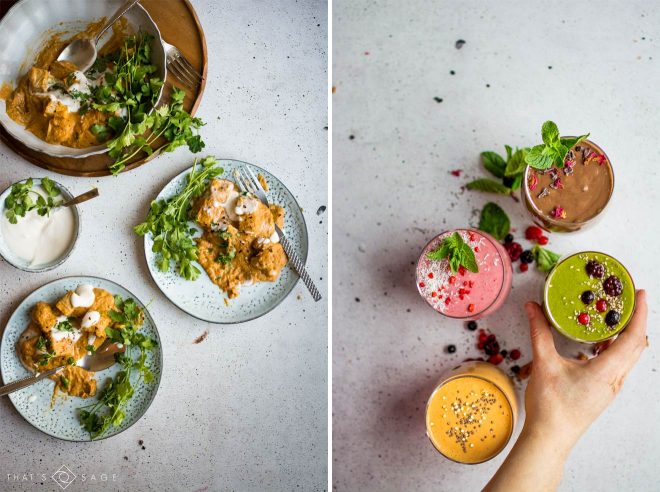
The curry you see in the photo above is a good example of complementary colour use. The green coriander makes the dish look vibrant and appetising. Without it, the photo would be a sea of orange curry, which while delicious, doesn’t LOOK as good.
3. Creating Balance In Your Food Photos
A sense of balance in your food photos is essential to draw the viewers eye right where you want it to go.
Balance in itself doesn’t mean everything being 50/50, or that you can’t have a frame full of beautiful food.
Balanced photos simply mean that the subject isn’t competing with other elements in the frame for the focus. You can create balance by using negative space, or even by balancing colour.
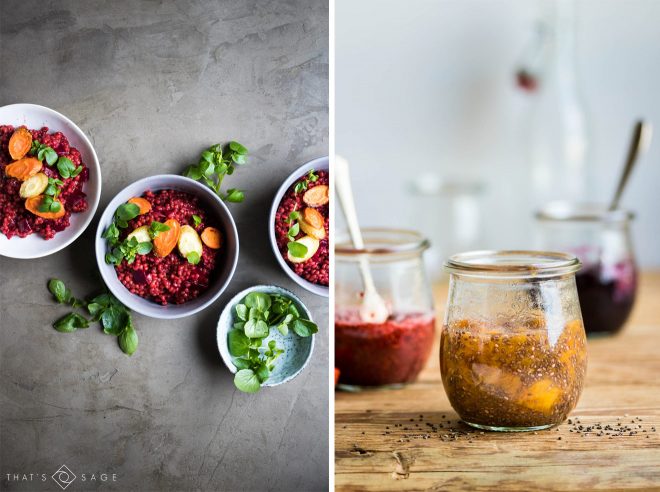
In this example, the photo of the beetroot risotto on the left makes use of negative space, placing the bowls along the central third of the photo, drawing your eye straight to it. In the jam photo, the horizon in the background creates some negative space, filled with just a couple of jars to help make an authentic scene, which creates a nice balance between the focus in the foreground and the background.
Ready for 5 MORE free food styling tricks? Sign up below:
4. Make your food photos look “lived in” with spills and sprinkles
One of my favourite food styling tricks is to use little crumbs and sprinkles to make my scene look real. When things look too perfect (particularly in food photography), it looks staged, and doesn’t help convey a story. It puts distance between the scene and the viewer, and it makes it harder for them to imagine themselves reaching in and taking a bite of the food.
So sprinkling around a few crumbs and spills can really help make your food scene seem like a table that’s just been stumbled across. This is something to play around with — it’s easy to go a bit too heavy handed on the sprinkles and just make a mess — but when it’s done right, it can really take your food photography to a new level.
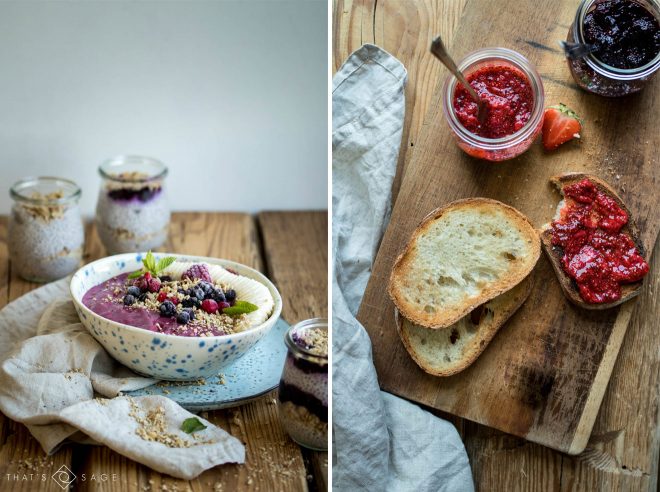
In this photo, I actually added the crumbs around the half eaten piece of toast by scrunching up a slightly overdone corner from another piece of bread. Before I added in the crumbs, the toast looked like it had been placed there intentionally, and the crumbs made it look like a delicious breakfast board being enjoyed on a Saturday morning.
A similar principle applies in the photo of the smoothie bowl. By adding just a few of the granola sprinkles outside the bowl, it helps the photo look a bit more “lived in” and realistic.
5. Give your food a helping hand
Sometimes the food you are photographing needs a little perk up. Here are some simple tips and tricks to help you along the way!
- Use a spray mister filled with water to gently spray salad and herbs to keep them looking crisp and fresh.
- Brush a little oil on top of dishes like roasted vegetables to keep them looking succulent and delicious.
- Small toothpicks can help you keep a burger arranged in the perfect way.
- Buy a set of fake ice cubes for your drink photos. No more rushing to capture the perfect shot before the ice melts!
- Undercook vegetables just a little bit to keep them looking colourful and crisp.
Want more food styling tricks? You’re in luck. (And E-Course info)
I want to share with you a bit more information about my e-course, “Food. Composed.”. The course is going to take you end to end through the principles of composition and food styling, to help turn you into the BEST food photographer you can be. Composition and food styling really are the foundation of food photography, so you won’t want to miss it.
Here’s a sneak peek at just a few of the lessons (there’s going to be tons more):
- How to use shapes in food photography
- Telling a story with your narrative
- Framing your food
- Minimal food styling
- Using backgrounds and textures to compliment your food
- Camera angles
- Choosing Props and how to use them
- Many many more!
If you’re ready to take your food photography composition to the next level, Food. Composed. is for you. Check out the course now!
Summary
- Food styling and composition is the backbone of good food photography.
- Plan your compositions before you start shooting for a more considered, thought out food picture.
- Use the rules of colour theory to help balance the colour in your food pictures and add contrast.
- Create balance in your photos with negative space or neutral props.
- Add a few natural crumbs and sprinkles to help your food sets look “lived in”.
- Give your food a bit of a helping hand with a quick brush or oil, or mist of water.
Your Turn
Go set up your food scene and pick one of these food styling tricks to practise. See what difference it makes to your photo, then move onto the others one by one!
Really good tips for food photography.
Best ideas for a perfect photo thank you, sir.
I am new to food styling and learned a lot by reading your blog. I particularly liked your tips. I am looking forward to more excellent advice.
I have written a blog using your tips have a look.
https://www.nitintandon.com/post/top-10-food-styling-trends-part-iii
Very proud well sometimes food styling allows me to escape of own ma cooking. I firmly believe that the precious tips bring my cooking level a brighter place^^muah ! sweet atmosphere
So happy to hear that you found this useful Suji!
Very amazing article, thank’s lauren, I just read 1 paragraph and more…more…more. Your article is wonderfull thinks.
I’m soooo glad you found it useful!!
Wow!!! You had written a very amazing article.
Thank you so much for this article…
Great tips Lauren! Here’s another trick: after you’ve undercooked your veg, make sure to plunge them straight into cold water to stop the cooking and preserve the bright colour. Sure, they’ll be cold, but if you want to eat the dish later you can simply reheat 🙂
That’s a great tip Emma!! You’re totally right, that cold plunge keeps everything looking nice and crisp!