


Welcome back to this series on using artificial light in food photography. In part one, we covered how to get that coveted natural light look using just one light and softbox. If you haven’t read part one yet, head over there now to catch up, and i’ll see you in a minute. In this part I’m going to focus on the food photography lighting setup I use, and how you can create two completely different lighting looks, using just one light source and softbox.
This post is not sponsored, but does contain affiliate links. This means if you click a link then make a purchase, we may make a small commission. This does not affect the price you pay, or our decision to recommend the products.
There are many reasons to get comfortable with more than one food photography lighting setup. For one, it will help you improve your skills as a photographer, but it will also add diversity to your photos. Being able to confidently light a set in different ways, will help you pick the best look for the type of food you’re shooting and the mood you’re going for.
In some cases, a dish might call for a light, bright side lit look, and in others, the perfect backlight will highlight the food’s best quality. In any case, whether you’re shooting for your own blog, or doing a client shoot, the ability to be versatile will help you no end!
If you aren’t sure where to start with your continuous light kit, we’ve put together a free PDF guide to help you get started. Download it free below!
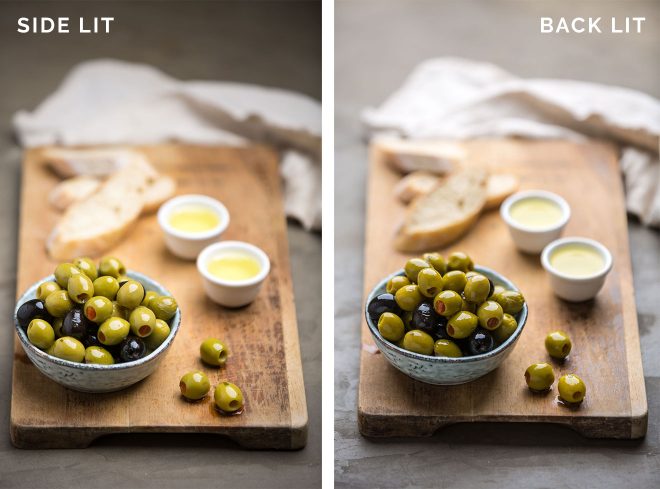
In the photo below, nothing has changed except the lighting setup, and you can see what a dramatic difference it makes to the final shot. Later on in this post, I’m going to show you the exact setup I used to create both of these shots:
The key thing to remember with artificial light is that you’re probably not going to get perfect results the first time you try a new angle. The same way it takes time to learn how to work with natural light, it also takes time to learn how to work with artificial light, so don’t give up.
In part 1, I mentioned the equipment that I use. I use a PixaPro LED200D mk II continuous light (US equivalent – Godox SL-200 LED), and a 120cm octagonal soft box with double diffusion. This light and soft box help me recreate the effect of shooting right next to a window flooding with beautiful natural light, with the added benefit that I can control the brightness, colour and direction, to create my perfect look.
In today’s post, I’m going to show you how easy it is to create a side lit and a back lit look, using just one light and soft box. If you want to see how I did this in video, you can watch below!
Back Lighting
Backlighting in food photography is a great way to emphasize the specular highlight on the top of shiny food. In my example above, the olives with their coating of oil look even more appetizing when they have a nice glow around the top.
To backlight, place the soft box behind the food, higher up above your set angling downwards slightly so you don’t just end up with a silhouette of your food. You’re not aiming to have the light visible in the shot, so getting the angles right is important.
Make sure you’ve set up your scene with the focal length lens you want, then with your camera on a tripod, start moving your light around to find the optimum position for your shot.
Need some help figuring out what gear you need to get started with artificial light? Grab your free guide below!
When backlighting, the use of a white or silver reflector is pretty important as the front of your subject is facing completely away from the light source. This means that without a reflector, the back of your scene will be overexposed if you use the camera settings to expose the front of your food, giving that not great “blown out” look to your back lit shots.
To avoid that, place the reflector at the front of the set and angle it towards the front of your food scene, so the light can bounce directly onto the front of the food. If you have a spare light stand with a reflector arm attached, this will help hold your reflector in the perfect position while you take the photo.
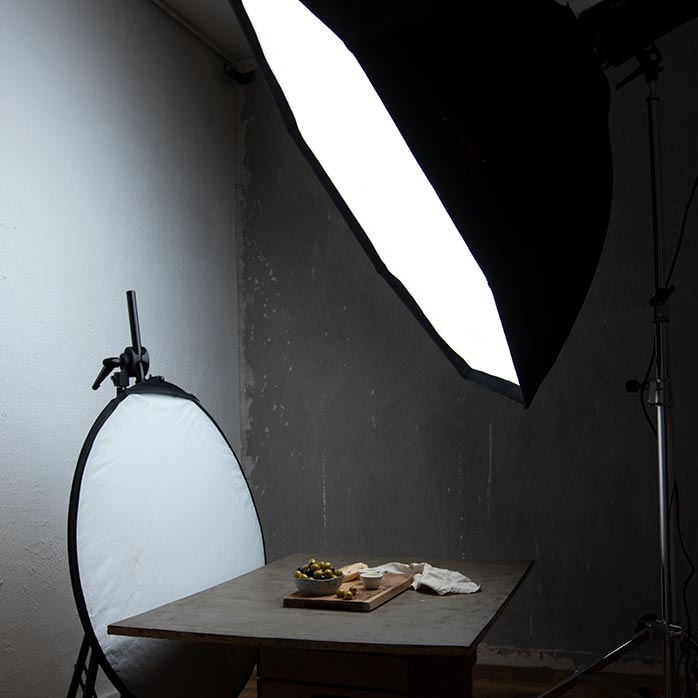
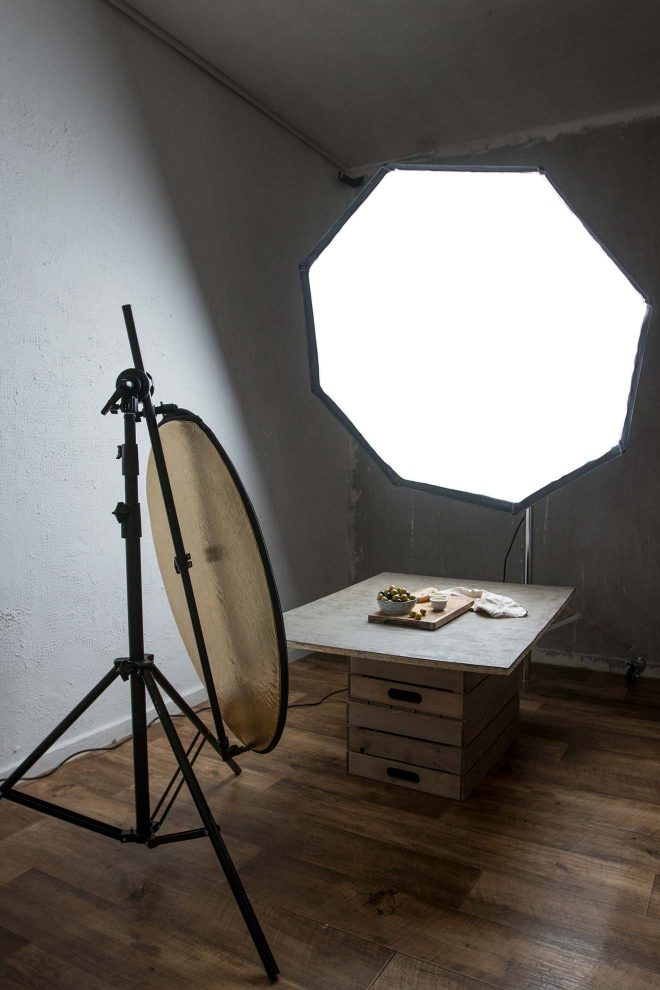
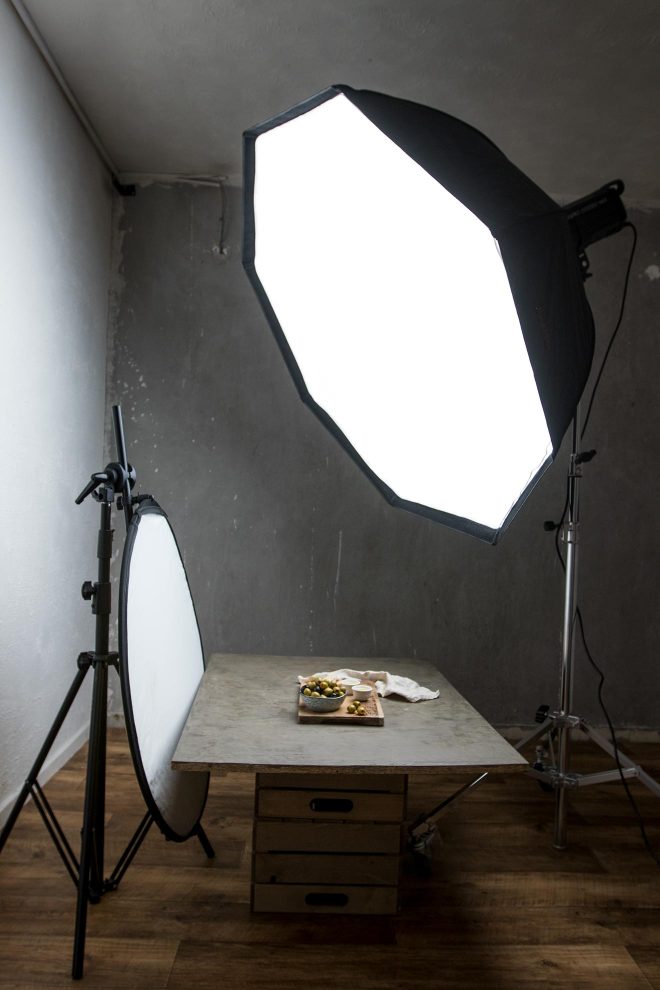
Here’s a view of the backlighting setup I used when shooting those olives:
Side Lighting
Side lighting is a great all rounder. It works for nearly every situation, so it’s a solid skill to have up your sleeve.
To light this shot, I’m positioning the light on a slight diagonal to the food, to give the shadows a bit of direction, and again I’m also raising the light higher above the set, and angling it downwards onto the set slightly.
When setting up your scene, play around with the direction of the light. The direction of the shadows in a slide lit shot has a huge impact on the look of the final photo. Depending on the angle you’re shooting your scene, a different direction may look better, so for a top down shot you may want the light higher up and pointing down on your scene more, and for a straight on shot you might want the light a bit lower to give you the opportunity to give your shadows more length and direction.
For this shot, I’m going to place a reflector directly opposite the light, to fill the shadows slightly, creating a light, bright look. If you’re going for a darker, moodier look where you want the shadows to create a lot of contrast on your food, you can either leave the reflector out of the setup, or even use a black fill card to absorb more of the light to accentuate the shadows.
Here’s a shot of the setup for my side lit photograph:
In our free PDF artificial light gear list, we’ve laid out everything you need to get started. Grab your free guide below
So there’s two, really different but really simple lighting setups you can recreate using just one light source and soft box. Nailing these setups will give you versatility in your work and confidence to try new things and start experimenting!
Your Turn
Do you use artificial light in your food photography? What kind of lighting setup would you like to recreate that you’re struggling with?
This post is not sponsored. Pixapro kindly sent me the light and softbox free of charge. All opinions are my own and I truly believe in this equipment and use it myself in nearly all my food shoots!
When I try backlighting I always get a sheen on the surface around the plate. I have printed ground plane woods and marbles by Black Velvet, but they always have a sheen. Tried hundreds of times and have now given up entirely, it just cant be done unless a organic surface is used.
I have recently set up a food photography room at my work and have just entered the realm of professional photography. I was wondering how much of your equipment you leave set up and which parts you disassemble to avoid dust/ aging? I have a dedicated space that everything could remain assembled in – if that helps with your answer.
very informative. Thank you so much… Would you please let me know the model of your reflector stand? Where did you buy it?
Thank you very much..
Lafaz
[…] With this idea in mind, it’s important to note that only quality photographs will get the job done. This is easy assuming you have a smartphone and know a little bit about lighting for food photography. […]
Hi there, nice video and hints. One correction thoguh: CRI stands for Color Rendition Index and shows how full specrtrum the light have, not the color temperature.
Hi Lauren! Awesome post and very helpful 🙂 Just wondering where you purchased your reflector stand/arm from? Thanks!
i just completed you 5 day course and wanted to say thank you for getting me off automatic mode and onto marnual! This video and blog ost was also super informtative, one thing im slightly confused about and may be a stupid question is exactly where i would position the camera/lighting in your above two setups if i wanted to do a flatlay? thanks again for being so helpful lauren
I really liked your post. I read your blog quite often and I just
shared it on Pinterest. Keep up the good work.
So happy to hear it’s helpful for you! Thanks for the share, always appreciated!
Thanks a lot for sharing your tips on lighting. Since this article is from a year ago , do you still recommend this Led or have you tried another one?
Also the diffuser you use is out of stock. Do you have any other recommendation (I want to use your affiliate link) ?
Finally with such light can we get some darker warm moods? Since it is close to daylight, would tungsten be better? I still hesitate between led and tungsten.
Also considering your classes bit will contact you later. Thank you. You’re inspiring me to take better photos
Hi Vero, I absolutely still recommend this light. Daylight simply means the colour of the light, which is what you want whether you’re creating a light and bright or dark and moody scene. For dark and moody setups I have a video on how I do this with this light! As for a softbox I would suggest anything around the 90cm-120cm range should be good! The brand isn’t so important.
Hi Lauren,
Can you recommend an alternative to this light that isn’t so expensive. As food photography is only an hobby I don’t want to spend so much money on it (at least not at the moment).
Thanks
Hi Mimi, i would definitely recommend looking into speedlights for a cheaper option, there’s more of a learning curve but I LOVE using flash too. I wouldn’t recommend buying a cheap continuous light as you’ll probably be disappointed with the results