


Dark and moody food photography is a style that has rapidly grown in popularity over the last few years – and it’s easy to see why! I love this technique because it adds such character and intrigue to photos. It can really elevate the beautiful textures at play in your subjects.
If this is a style you are hoping to develop, you may wonder if you need elaborate equipment or lighting to achieve it. I’m here to share some good news: there are some simple tricks that make it easy to create striking images. I’m going to share my amazing one light set-up for dark and moody food photography!
If you’d prefer to watch this in video format rather than read, I’ve got you covered:
What You Will Need
One of the things I love about this technique is how straightforward it is! You will need:
- A single light source (artificial or natural)
- Black foam core (at least three panels)
- A dark-coloured background
- Dark-coloured props
Contrast Is Key
Did you know that dark and moody food photography comes from a technique originally developed by Renaissance-era painters? It’s a technique that is called chiaroscuro that works by emphasising the contrast between light and dark.
The key for us as food photographers is to manipulate the lighting in order to accentuate the contrast where the light creates shadows. So, even though we’re creating dark and moody food photography, it’s actually important that the photographs are not too dark. If the images are leached of light and bright spots, they’ll become flat and boring and lose that compelling edge we’re looking for.
Instead, you want to add light into your composition in very deliberate and controlled ways.
Dark Backgrounds and Non-Reflective Props
As you begin to stage your photographs, make sure to use dark-coloured backgrounds and props. These will absorb the light and help you to be very strategic about the bright spots you introduce into the photo.
One of the strengths of this style is that it draws the eye and attention to the main subject almost exclusively. Because you have very few moments of light – starkly emphasised by the surrounding darkness – the textures and contours of the main subject are brought forward in a beautiful way. That’s why dark backgrounds are so important.
When I’m creating dark and moody food photography, I want to be totally in control of the lighting, without having light bounced around in reflections. I would suggest that you avoid props that are bright or reflective and instead use matte finishes and muted tones. If you absolutely must use silverware, look for pieces with patina – this will cut down on the shine and also add to the dark and moody food photography atmosphere that you are creating.
Related: Photographing Silverware, Cutlery, and Utensils, Without the Ugly Reflections
My Easy Dark and Moody Lighting Setup
Once you have your dark background and props, it’s time for you to set up the lighting!
Light Source
In this set-up, you only need a single light source. Generally, I prefer to use artificial lighting when I’m creating this kind of dark and moody look, but you can modify natural lighting in the same way if you wish.
I find that using a large softbox with diffused light allows me to create the beautiful soft shadows I’m looking for in dark and moody food photography. If you want to accentuate the contrast with more direct lighting, you could add a honeycomb grid.
Creating Directional Lighting
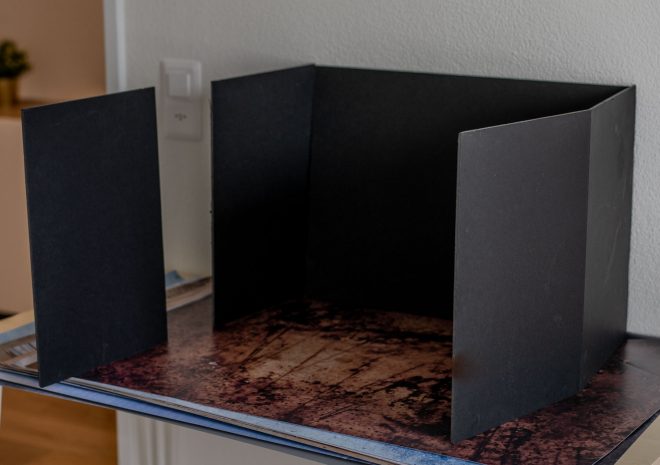
The key to creating great dark and moody food photography is how we modify the light. I use pieces of black foam core to direct the lighting across the frame.
First, I put a piece behind the subject, on the side opposite to the lighting source: this is so that light is absorbed rather than bouncing back onto the subject. This ensures that the shadows are particularly deep and lovely, which is exactly what you want when you are creating dark and moody food photography images.
Then I prop up pieces of the black foam core to screen off quite a large portion of the light source so that only a thin strip of light emerges. When you are doing this, make the section of light small enough that it only falls directly on your main subject and leaves the rest of the scene in relative darkness.
You can position your foam core to decide exactly where in the scene you want the light to fall. This is going to give you a really natural dark and moody look, allowing you to draw attention to your main subject and keep the rest relatively out-of-focus.
Endlessly Adaptable
One of the reasons I love this technique is that, besides being incredibly simple, it really can be adapted to all kinds of shots. Whether you’re shooting close-up or a wider spread, side-on or from above – introducing a thin, deliberate bar of directional light will produce beautiful shadows and points of contrast to instantly create dark and moody food photography.
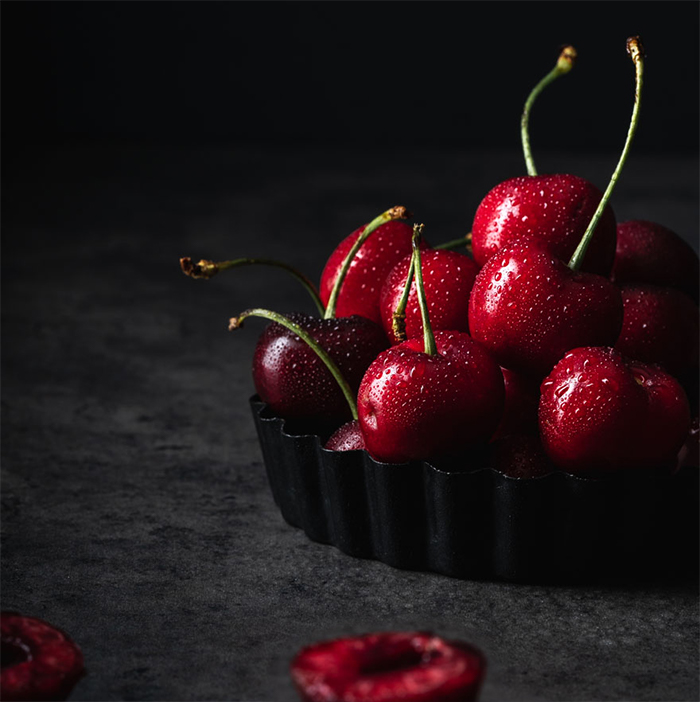
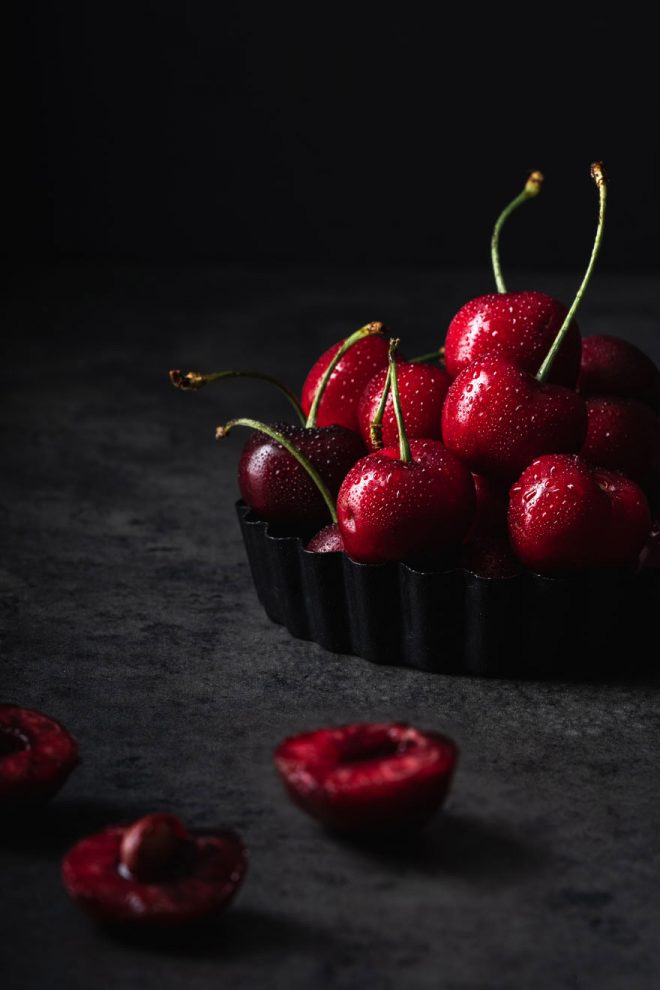
This technique is particularly striking for highlighting the incredible textures on food – crusty bread, or shining fruit, for example.
The Extra Mile – Radial Filter
To take this style to the next level, I love to use the radial filter in Lightroom. This tool allows you to create a custom circle or shape around your subject and then darken the area around it. It’s a really great way to get a very specific vignette.
Final Thoughts
So there you have it – a simple and breathtakingly effective one light setup for dark and moody food photography! This will help you to create beautiful images with really intriguing light and dark contrasts.
As you know, lighting is so often the make-or-break element of a shoot. And, as we’ve just discussed, lighting can totally change the atmosphere and style of a photograph! To learn more about effective lighting for food photography, check out my blog walking you through the lighting equipment you need in your home studio. I’ve done the research (budget and availability included!) to help you take your photography to the next level.
Hi. I’ve been trying to figure out how to shoot using this method for a long time. I read this and was finally able to do it using a set up similar to yours. Thank I so much.
Beautifully done and very helpful
Very good short succinct video on dark food photography Lauren. Really like how you showed your setup. Keep ’em coming!
I will do Reid, thanks!
Beautiful I love the mystery of dark and moody photos thanks for the mini course.
It is one of my favourite things to shoot!