


Adobe Lightroom is an incredibly powerful tool. And unlike Photoshop, it’s pretty straightforward to use – even for beginners. As intuitive as it can be though, in order to get the most out of your Lightroom editing sessions, you really need to know your way around the application.

What’s more, the easiest and most obvious techniques aren’t always the best ones. And if you don’t know what you are doing, you can easily waste a lot of time. Or, worse still, end up editing your images in a destructive manner.
In this post, I look at 5 of the biggest newbie Lightroom mistakes, and ways to avoid them.
1 – Having Only One Lightroom Catalog… ever
Lightroom uses a handy file-organization system, called a Catalog, to help keep track of your images. The main advantage of a Catalog is that it doesn’t store actual image files themselves, just information about any edits you’ve made to them.
These info-only LRCAT files occupy much less memory than an image file, meaning that you can easily organize your images without wasting precious disk space on duplicate files.
The thing is though, while LRCAT files occupy infinitely less memory than an image, they still do use up some memory. And once you’ve been shooting for a while and made a lot of edits, a Catalog can become so bloated that it really starts to slow things down. This can be extremely frustrating to work with.
Using just a single Lightroom Catalog for your entire archive of photographs will soon become unmanageable. My advice is to start a new Catalog at the beginning of each year, as this will really speed things up and make it easier to locate your images.
Personally though, I go a step further by creating two Catalogs each year: one for personal work, and another for client shoots.
It can also be good to give your Catalogs a quick “service” every now and then by going to the File menu and choosing Optimize Catalog.
2 – Ignoring Histograms
You might be thinking… what on earth does my histogram have to do with Lightroom?!
Ignore histograms when you shoot and you’ll make bad exposures. Ignore them in Lightroom and you’ll make those exposures even worse…
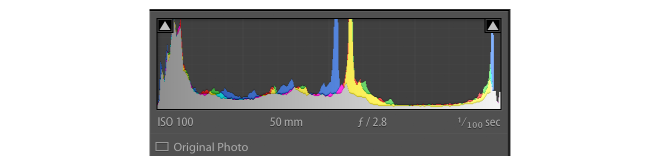
Ignoring your histogram risks blown-out highlights and clipped blacks. And if this data was lost in-camera, no amount of editing will bring it back.
Pay close attention to your histograms when you edit. Extreme changes to contrast and exposure risk negatively impacting the quality of your photos. Not only this, but you should be closely studying your histograms when you shoot too, to see if your exposure technique can be improved next time you shoot.
For more info on how to read your histogram for better exposure, check out this post
3 – Not using Hotkeys
Using the mouse to click on every single adjustment you need to make? Not only is it not efficient, it slows you down more than you realise. All those little moments you spend moving the mouse around are moments that add up to a significant amount of time.
The key is to work smarter, not harder in Lightroom Classic. You can read about my favourite Lightroom Shortcuts for food photographers here, and click below to grab my free PDF guide to keep them handy at all times!
4 – Sharpening the Entire Image
I apply some sharpening to pretty much every photo I edit. What I never do, however, is apply sharpening across an entire image.
Sharpening works by increasing edge contrast, helping to give an impression of more defined detail.
But what happens when you sharpen a shot that has a narrow depth of field? On a photo taken close-up at f/1.8, large parts of the background are likely to be a beautiful blur of bokeh.
The only detail to sharpen here is grain, so applying general sharpening across the entire image will make it more noisy and pixelated; often with strangely harsh and glowing edges. Not so good.
Instead, bring up the sharpening controls and hold down the OPTION/ALT key to preview its effects. For more refined, precision sharpening, be sure to make use of all the sliders, including the Radius, Detail, and Masking controls.
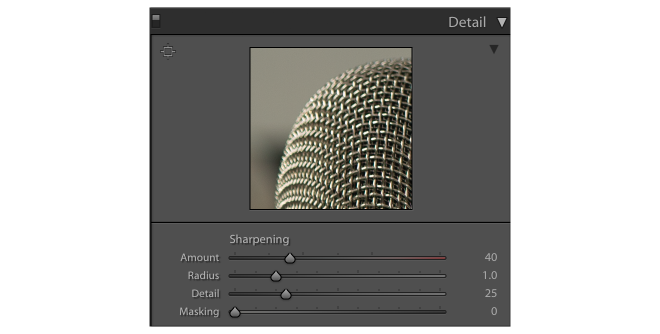
The Radius Slider – As I mentioned above, sharpening increases edge contrast. But how big do you want that edge to be? The Radius slider lets you set how many pixels will be affected either side of the edge. Zoom in and play around with this setting until you find a point where contrast improves, but before you start to get noticeably thick, almost shadow-like, edges.
The Detail slider is equally important, as it allows you to choose whether you want sharpening to be applied only to larger edges/details, or also to much smaller ones too. On a photo of an orange for example, using a low setting here would only increase sharpness around the edge of the fruit; whereas a much higher number would likely sharpen the detail of every pit in its skin, too. Just bear in mind that a higher setting is likely to result in a much noisier image overall.
The real key to good use of Lightroom’s sharpening features, though, are the Masking controls. By adjusting this slider you can tell Lightroom only to sharpen the foreground, while keeping background areas totally noise-free.
For more info on this topic, and other great editing tips, check out my post on food photography Lightroom hacks.
5 – Editing JPEGs
JPEGs have their uses. But they should never be where you do your Lightroom editing for your professional work.
In order to be able to shoot the best quality photos, you probably spent quite a lot of money on your camera, right? If that’s the case, it makes no sense to then go and edit a JPEG file.
A JPEG is by definition a compressed file. This means that valuable information has already been removed from it. Information that you can never get back. So by editing a JPEG, you already start off at a huge disadvantage.
A RAW file, on the other hand, contains all the information that your camera was able to capture at the time of pressing the shutter. By editing a RAW file, you retain all that information.
What kind of information are we talking about here? Good information. Information that makes for better quality photos. Things like a wider range of colours, greater detail in highlight and shadow areas, superior resolution.
And if you need a JPEG later on; no problem, you can make as many as you want from the RAW. But nothing short of divine intervention will turn a JPEG into a high-resolution RAW file.
For more in-depth info about the advantages of shooting in RAW format, take a look at this article on RAW format for food photography.
Final Thoughts
I love working in Lightroom Classic CC, and editing will really bring out the potential in any photograph – often transforming it from a mere contender to a total winner. Just as long as it’s done right.
Don’t forget to grab your free Lightroom Hotkeys guide for food photographers, I promise you it’s going to change your workflow!
Thank you Lauren!