


One of the questions I get on a nearly daily basis, is what equipment I use, so in this post I’m taking you through everything in my current 2018 food photography kit, including what I use it for!
Every kind of photography is different, and the equipment we use varies depending on what we’re trying to achieve, so I invited my good friend Jeremy Jude Seow from Memory Lane Productions, who’s an amazing portrait, landscape and street photographer & videographer to join me in this video, and take you through his photography kit too!
I will preface this post with this, THE GEAR YOU HAVE IS NOT THE MOST IMPORTANT PART OF YOUR PHOTOGRAPHY! The quality of your work is not defined by the price tag of your gear.
Sure, expensive cameras and lenses offer some amazing things, but like I’ve said many, many times in the past, I shot my first magazine cover on a $300 crop frame entry level DSLR (A Nikon D5200), and I LOVED that camera.
The most important thing to bear in mind when you’re choosing your gear and building your collection is to really intentionally choose each piece. Don’t just get a “nifty 50” because that’s what everyone else has. Spend time researching which focal lengths are good for producing which kinds of images, and choose based on the images YOU want to create. And don’t be afraid to shop around the brands too, having a fancy name tag on your lens doesn’t necessarily make it better.
Related – A guide to choosing your lenses for food photography
So with that out of the way, I’m going to take you through everything in my current, 2018 food photography kit, and also what’s in the kit of a portrait/landscape photographer!
Disclaimer: some of the links in this post are affiliate links, meaning that if you click on them and go on to make a purchase, I may receive a commission. This does not affect the price you pay.
The Camera I Use for Food Photography
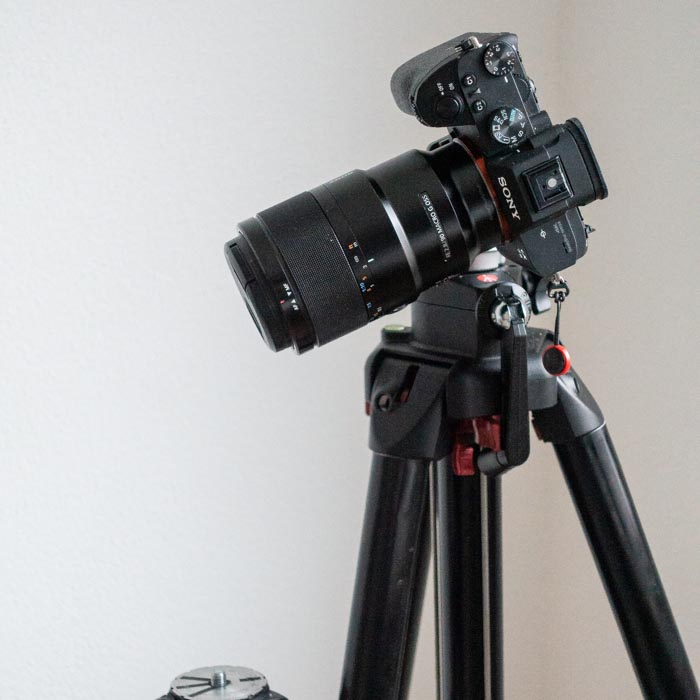
Sony Alpha A7 III, Mirrorless Digital Camera
I recently upgraded my Canon 80D to the Sony Alpha A7 III, a full frame mirrorless digital camera (full specifications here). I’ve been shooting on the Sony A7 III for about a month now and I’m not sure I’ve ever been so in love with a camera! It boasts a 24MP sensor, which is more than enough for my needs as a food photographer.
It’s a really great photo and video camera, combining some of the best features from Sony’s flagship photography camera, the A7 R and their video model, the A7 S, with the autofocus system from the A7 9.
The camera has a CMOS, 35.6 x 23.8mm sensor, shoots in JPEG and RAW (I always shoot in RAW as standard) and has 5 way sensor-shift image stabilization.
For video, this camera can shoot 4k, and up to 120fps in full HD. This has allowed me to get some great slow motion shots that compliment food video so well (I included some example footage in the video above). As food video is becoming more and more of an industry standard for food bloggers and photographers, having a camera that can comfortably handle both is a massive plus!
All in all, this is an incredibly powerful, high quality camera, that retails for around $2k. You get a LOT of camera for the price making it a real competitor on the market right now!
However, no one knows why Sony doesn’t put proper flip out screens on their cameras… sigh.
I’ve had the Sony RX100 IV for about 3 years now (full specifications here), and since I bought it the V and VI have been released. However I don’t feel the need to upgrade as the difference between the IV and the VI is not big enough for me to worry about.
This compact camera is an absolute beast. It has a 21 MP sensor, a 24-70mm build in lens with a maximum f-number of f/1.8 – f/2.8.
In it’s tiny shell lies the ability to shoot in up to 1000fps (although only at 480p). However, you are able to shoot at up to 250fps in nearly full HD meaning I’m able to get super slow motion, silky, food-advert worthy shots on my tiny camera.
The photographs are also fantastic quality, making this a great on the go camera. I normally have this camera on me as it’s so light and portable.
The main downside to the RX100 is over heating. Because of the size of the camera, it has limited capability to film in the high frame rate modes for very long without needed to switch off and cool down. I rarely encounter this as I
use this camera for secondary shots, but I wouldn’t use it as my main video camera.
My Lenses for Food Photography
Sigma Art 35mm f/1.4 + Canon to Sony Adaptor for Sigma lenses
This is my widest lens that I mostly use for top down (flat lay) shots when I have quite a bit to capture. I was using this lens on my Canon 80D (a crop frame) so it behaved more like a 50mm on that camera. The Sigma Art Series lenses are SUCH good quality, I really didn’t want to let this one go when I changed, so I was really glad to be able to buy an adaptor to continue using this on the Sony A7 III.
As far as performance with the adaptor, the lens works exactly the same, it still autofocuses really fast. The only difference I notice is that when I shoot tethered, I can’t autofocus through the tethering software. This isn’t much of an issue for me as I mostly use manual focus anyway!
Photo taken with Sigma 35mm f/1.4 lens
My 55mm f/1.8 is my mid-focal length prime. This is a SUPER versatile focal length. I opted for the 55mm f/1.8 rather than the 50mm f/1.4 mostly because of the price difference, and because the 55mm f/1.8 offers SUCH great quality, and I rarely find myself wanting to shoot at f/1.4 for food photography. f/1.8 is more than wide enough for me!
I use this lens for a wide variety of shots from top down to straight on and 45° shots.
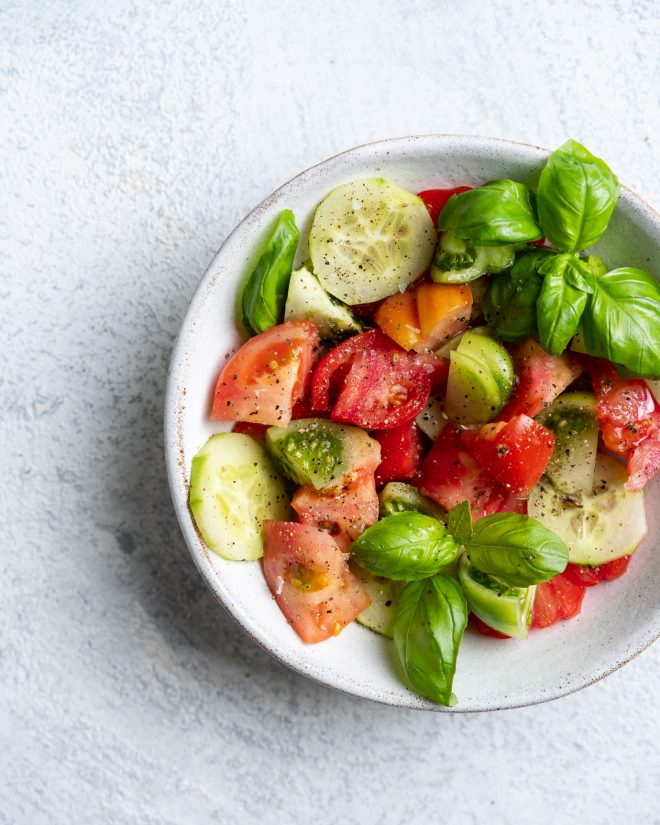
Photo taken with Sony Zeiss 55mm f/1.8 lens
Saving the best til last, my 90mm f/2.8 Macro lens, also Sony Zeiss is probably my new favourite lens, and I have it on my camera 80% of the time. This focal length is one of my favourites to shoot at in food photography, for anything other than top down shots.
It allows me to get a narrow field of few, keeping all the perspective lines in my photo nice and straight, creating that magazine photo look. The macro capabilities are something I could never give up now I’ve had it in food photography, and I’ve taken some of my favourite photos on this lens!
Photo taken on Sony A7 III with Sony Zeiss 90mm f/2.8 Macro Lens.
Food Photography Lighting Setup
Pixapro LED 200D mkii with Pixapro 150cm Octagonal Easy Open Softbox
I’ve been shooting with artificial light pretty much exclusively for the last 8 months. I live in the northern hemisphere where natural light becomes pretty non-existent after 3pm in the winter months, and I needed a better solution.
I shoot with a continuous, DC, LED light, with a large softbox attached. Most of the time, I also use the honeycomb grid over the softbox to make the light a little more directional and contrasted. I like the look this gives but you can absolutely shoot without it for a softer light look.
Related: My Easy Artificial Light Setup for a Natural Light Look (video demonstration)
Tripod and Accessories
Manfrotto MT190XPRO4 Tripod
Manfrotto 131D Side Arm
Manfrotto 496RC2 Ball Head
I’m a big believer in shooting on a tripod for food photography. Not only can you nail down your composition for better, more considered food photos, but you’ll give yourself MUCH more shutter speed flexibility (great if you’re in a more low light situation), and the ability to use manual focus accurately.
All of these small details play a part in taking your food photography from good, to great, so if you’ve been hesitating buying a tripod up until now, I urge you to try it out today!
Related – Why you should be using a tripod for your food photography
Tethering/Remote Shooting
Tethering your camera to your computer is a great way to get a much larger preview of your image, plus the ability to control your camera from your computer, allowing you to find tune your settings without having to get into weird positions and crane over your tiny live view screen.
Each camera needs a specific tethering cable so Use this tool to figure out which cable you need for your specific camera.
As I now shoot Sony, I use the Sony Image Capture software, but all major brands have their own software, and they’re mostly free.
Related – How and Why to Tether for your Food Photography
A remote shutter is an in between step if you’re not tethering. It allows you to release the cameras shutter without touching the camera, avoiding any subtle image shake. A cheap piece of equipment that will make a huge difference to your food photography!
Everything Else
A white balance card is a really nice to have tool in your kit, to help you nail your colours straight out of camera every single time. Since I started to consistently shooting with a custom white balance, I’ve spent far less time in post production editing my white balance. Something that has really helped my photos look more consistent and realistic.
Related – How to set a custom white balance for perfect colour in food photography
This reflector has 5 different options for shooting with, making it super versatile. The central part is a diffuser, so if you’re ever caught with some direct sunlight you want to diffuse, this is a really easy way to do that. It then has a double sided, reversible cover which offers a white, silver, gold and black side. This allows you to have three different options for reflecting light, and one for using a fill light when you want to really accentuate shadows.
Onto my last piece of “kit”. I say “kit”, because this isn’t photography equipment persay, but I’d argue it’s one of the most important things I own. Backing up everything I shoot is an essential part of the process, ensuring that nothing gets lost due to a corrupt memory card or dodgy laptop.
I shoot in Raw Format so my files straight out of camera are quite large, meaning 2 TB offers me a lot of space before my harddrive gets full and I need a new one.
Jeremy’s Gear
Cameras
Lenses
Sony Planar T* FE 50mm f/1.4 ZA Lens
Sony FE 70-200mm f/2.8 GM OSS Lens
Sony Vario-Tessar T* FE 16-35mm f/4 ZA OSS Lens
Lighting
Aputure AL-M9 Amaran Pocket-Sized Daylight-Balanced LED Light
Tripod
Manfrotto BeFree Compact Travel Carbon Fiber Tripod (Carbon)
Monitor – The Atomos Ninja Assassin is no longer on sale
I hope you found this post useful! The gear I have chosen is a collection thats been built up over time, that I carefully compiled based on my needs.
Don’t forget to subscribe to the That’s Sage YouTube channel for lot’s new videos!
Great post Lauren.
I have just purchased the Manfrotto 190XPRO4 Tripod after one of your earlier post.
Do you recommend the purchase of the additional side arm? Does it come with the right screws? Do you attach any kind of weight? (I shoot with Canon 80D and 50mm 1/8).
Thanks